The Ladies' Tea Guild

Thursday, December 31, 2009

Victorian costuming for women: hair arranging.

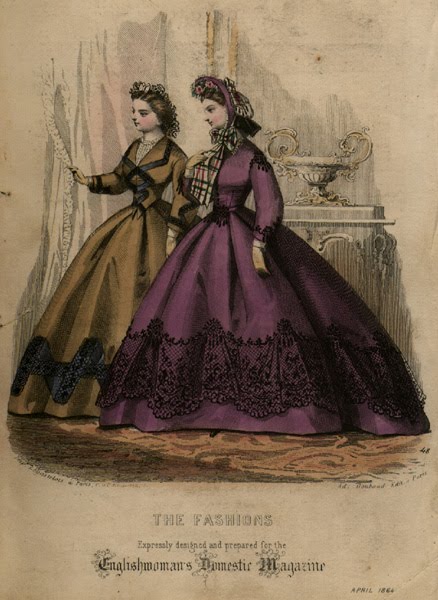
Victoria Fashion magazine. 1869 fashion plate. Wikipedia.
Even though the Great Dickens Christmas Fair has ended for the year, there are many 19th century-themed events scheduled for 2010 in various parts of North America, and appropriate Victorian costume is a good addition to the ambiance. One detail that can really distract from an otherwise good Victorian appearance is a modern hairstyle. Hair that was loose, "piecey", wispy, or with "body" was not the stylish ideal for women! Women's hair was supposed to be glossy, smooth, controlled, off the face, and elegant, and anything else was considered sloppy, un-groomed, and unbecoming.

When you wear a Victorian costume, your hair should not be in an obviously modern style. At the very least, your hair should be parted in the middle, smoothed down (use mousse or gel for this), pulled back and pinned at the back of your head. If you have bangs, even they should be parted and slicked back, and they can be twisted together and pinned back to hold them in place. Although it is the current style for grown women to wear their hair down, for Victorian outfits, avoid wearing your hair loose if you are older than 12 years old! Even actresses and prostitutes wouldn't have worn their hair down in the streets unless they were "advertising" ...
Wikipedia image, 1840s.
Long hair can be braided or coiled into a bun and pinned up above the nape of your neck. If your hair isn't too long, or if it is shorter around your face, you can pin or slick back most of your hair, and curl your front hair (over your temples, in front of your ears) into ringlets that hang in front of your ears. These were called "sausage curls" in the period, because they appeared as round and solid as sausages! They should be very smooth, thick and glossy, they should not hang much lower than your jawline, and they should not hang over your forehead like bangs. Use lots of mousse, gel and hairspray to keep everything smooth! They should peek out from the brim of any bonnet or cap that you wear.

Portrait ca. 1865. Wikipedia.
If your hair is too short to put in a ponytail, you should part it, gel it, comb and bobby-pin it to slick it behind your ears, try to make it as smooth as possible, and keep the back part covered with your bonnet. Conversely, you can curl all of your hair into smooth ringlets, all over your head, and let your front curls peek out from your bonnet brim. You can also get a natural-looking wig or hair-piece and style it in a Victorian style if your hair won't do what you want.

If your hair is dyed an obviously non-natural color, and you don't want to use a wig or re-dye your hair, your best bet is to cover it completely. Even though it was about 50 years out of date by the 1850s, the white “mob” cap style is good for this. Curl the hair along your hairline into pin curl ringlets so that they won't be so modern-looking if they peek out from the edges of your cap. Even if your hair is a natural color, and even if you have long hair, if you are over about 40 years old, you should also consider a cap. Cap information will be posted next!

Monday, December 28, 2009

Tonight at 9 -- Louisa May Alcott: the Woman Behind Little Women

Louisa May Alcott, ca. 1857. Wikipedia.
Taking a break from costume articles (after having taken a break from them for Christmas), I finally confirmed the essential information about the new documentary about Louisa May Alcott! Little Women was one of my favorite books when I was younger, as it was for many other kids, and I have always wanted to know more about its author, who modeled Jo March after herself. The documentary, Louisa May Alcott: the Woman Behind Little Women, will be broadcast today, December 28, 2009, on PBS, beginning at 9 p.m.

Bringing in a Victorian costume bit, it looks – from the commercials – that the costumes for this film will be fairly historically accurate. Like the similar documentary from last year about Isabella Beeton, this may turn out to be a film that will be worthwhile to purchase when it comes out on DVD. I will be looking for it!

Louisa May Alcott: the Woman Behind Little Women (show website)
The Louisa May Alcott Society

Thursday, December 17, 2009

Dickens Fair costuming for women: bonnets and other headgear.

Costumer's Manifesto. Peterson's Magazine, 1850.
A hat or bonnet was necessary outdoor wear for women and girls. Although historically accurate, beautiful, hats and bonnets can be purchased from costume vendors and professional milliners (including those at the Dickens Fair), they are expensive. You can’t make a *great* hat or bonnet without study, training and a lot of work, but you can approximate a *pretty good* one with patience and a bit of handiness!

Look for thrift store and discount store hats that are made of wool felt, in a boater (narrow brim, flat crown), picture hat (wide brim, round crown) or pillbox (flat crown, no brim) shape. Ladies' "church hats" are useful for this. Take off all the modern trim, which will probably be hot-glued on. Feel free to cut your hat to make it the right shape (cover the cut edges with ribbon sewn or hot-glued on top). If the brim of the hat is large enough, you can cut off the back of the brim (behind your head), and fasten long ribbons to each side (tie them under your chin) to make it into more of a bonnet shape. If you know how to use the steam function on your iron, you can steam the felt until it's damp, re-shape it over a bowl or something that's the shape you want, and let it dry to have a better bonnet shape. This can be tricky, though, so make sure you have time to fiddle with it and practice before you need to wear the thing!

You can also cut the entire brim off of your hat, just leaving the crown, as a pillbox style hat. Some stores (like Target) sell pillbox style hats in fake fur that will look good as-is, if you just pin, glue, or sew a feather and ribbon bow on one side or the front. If all you can find is an old straw hat, be sure to hot-glue or sew some fabric over it so that no straw shows. Solid, dark-colored velvet, corduroy, wool, or thick flannel with no printed design will work for this; shape the fabric to the straw hat with pleats, making the pleats look as nice and smooth as you can, and hot-glue, safety pin or sew it in place, fastening the edges to the inside of the hat.
Cathy Decker. 1850.

Decorate your hat with ribbon, silk flowers, feathers, etc. to coordinate with your costume (it doesn’t have to match all the colors exactly), fastening the ornaments on with straight pins, safety pins, hot glue or needle and thread. Bonnets had trim edging the brim, on the sides over each ear, in a line from ear to ear over the top of the bonnet, along the back neck edge, and inside the brim framing the face. Keep your hat or bonnet on your head with a proper hat pin (like a straight pin, but 5 to 10 inches long) stuck through the hat on one side, through your hair inside the hat, and through the other side of the hat, or with small plastic combs sewn into the inside of the hat. Pillbox hats and bonnets should have long ribbon ties securely fastened (sewn or safety-pinned) to the inside, over each ear, to tie under the chin when worn. These ribbons should coordinate with the other trimmings on your hat or bonnet.

Friday, December 11, 2009

Dickens Fair costuming for women: stockings and shoes.

Moniteur de la Mode. 1855.
Sorry for the lag in posting! I lost my Internet access for a week and couldn't finish my research or post anything up! Here is the next section of Dickens Fair costume information: shoes and stockings.

While ideally, your dress will be long enough to cover your feet most of the time, you'll need your skirt to be short enough so that you don't step on it, and that means that your shoes and socks will show somewhat. Stockings should be black or white and can be modern tights or nylons, since they will be almost completely hidden. Knee-highs and regular black trouser socks will work well, too, as long as they're tall enough to cover your legs up to the knees. Do avoid fishnets or tights with colored or sparkly designs on them, because your ankles will be seen as you walk, and designs like that are obviously modern. Your stockings should also be heavy enough that you can’t see your skin through them; modern "sheer" nylons are too see-through!

As for shoes, especially avoid sandals or open shoes, running shoes, anything with chunky platform soles or stiletto heels, cowgirl and Army/work boots! Shoes should be of the lace-up or pull-on granny boot type, in black or brown, with low (1 ½ inches or lower) or flat heels. Sometimes you can find black half-boots in this style that have a discreet zipper up the inside of the ankle; while the zipper was not yet invented in the Victorian era, if the zipper is narrow and not set off by shiny or brightly colored trim, it should be unobtrusive enough. If you can find black adhesive tape (in the automotive section at Wal-Mart, or Orchard Supply or Home Depot) you can use it to cover up any really shiny trim like visible snaps, studs, or sequins. Leather, vinyl, or cloth shoes or boots in this style can often be found at thrift shops and at Wal-Mart and Target, and you can get them a little larger than you need and add an insole inside for comfort. You can also use black Chinese shoes or Mary Janes, or even black Keds, if you have nothing else! They aren’t what a woman of Dickens’ time period would have worn, at all, but they are simple, and black and, with black stockings, they will help your feet “disappear” under your skirts, rather than drawing people’s attention.

If you can’t manage black or brown boots or shoes, then you can buy black knee socks at the thrift store – make sure they’re several sizes too large – cut off the heel and most of the sole (except for about an inch right under the arch of your shoe), and pull them on over your colored shoes to cover them up! They will be like “spats”, except they should cover your whole shoe, or anything that’s not very dark in color. If you like, you can sew or glue a line of black buttons up the outside of the ankle on each one, to give the illusion of wearing buttoned boots. Tuck the top edge of the sock under at about 2 inches above your ankle bone (unless your boot tops are higher) to make them look more like boots, and sew, glue or duct-tape it down on the inside of the sock. You're almost ready to go! Next will be other accessories like bonnets, gloves, and shawls.

The official Dickens Fair costume guide
Dickens Christmas Fair website
Kay Gnagey’s 19th Century Costume Research Center
Elizabeth Stewart Clark’s Sewing Academy

Thursday, December 3, 2009

Dickens Fair costuming for women: Part 4 -- the collar and neckline.

young woman from San Francisco in the 1860s. Sense & Sensibility.
Again, when looking for a blouse to make into a bodice, choose one that has a high jewel neckline, fold-down or Peter Pan type collar or the stand-up mandarin type. These were, by far, the most common necklines on day dress bodices during Dickens' career. If your blouse bodice has a stand-up Mandarin collar, pointed, turn-down collar or rounded, Peter Pan collar, you can leave it as is, and just pin a brooch or ribbon bow at the top button when you wear it.

If you have a white button-down shirt that has a collar, however, you can cut the collar off of the business shirt, cut the collar off of the blouse bodice, and replace it with the white collar from the business shirt. That will give you the look of wearing a white linen collar, which was much more common than wearing colored collars. You have to sew it on, though, as glue and safety pins would not only be very visible so close to your face, but also be uncomfortable. Tuck all raw fabric edges (cut edge of fabric where it frays) to the inside of the neckline and make sure they're fastened down and hidden.

If you can't find a suitable thrift store blouse with a collar, to make into a bodice, then you can use certain collar-less blouse styles. If the blouse bodice has a high jewel neckline with no collar, you can use that same collar from a white thrift-store business shirt, sewing or safety-pinning it inside the neckline so that only the fold-down part of the collar, and not the band that buttons around the neck, is visible. If you like, you can also try a narrow lace collar, especially white crochet or delicate white lace, rather than ecru or other colors, or Battenburg lace; Michael's craft stores sometimes carry them, but also try to find one that is only 1 or 2 inches wide, since that was the fashionable collar size in the mid-Victorian era. The huge sailor collars, or large Battenburg lace collars should be saved for a different project, since they came around -- for adult women's clothing -- much later than the 1860s, and they're one of the things that really shout "modern" when on a Victorian costume!

If the blouse bodice has a turned back (with revers, like a camp shirt), V or squared neckline, it needs what was called a "guimpe" or "habit shirt" underneath. Visible decolletage on the street is not an appropriate look for a "decent" woman! To get this look, you should wear a modern white “dickie” with a Peter Pan style collar underneath, or cut off the upper part of a collared white shirt, including the shoulders, upper chest and collar, and wear it underneath your blouse bodice as a "dicky". Pin it inside the neckline of the blouse (make sure the pins don’t show!) so that it doesn't shift around as you wear it, and make sure all skin is covered. Accessorize with a simple, delicate brooch or grosgrain ribbon bow safety-pinned in place, and you're on your way!

Monday, November 30, 2009

Dickens Fair costuming for women, part 3: altering the sleeves.

Monitor de la Mode, 1855. Costumer's Manifesto.
Sometimes, the sleeves of your thrift store blouse or shirt will need alteration, too, in order to work for a Dickens Fair outfit. This is another area where a too-big shirt or blouse will make a better mid-Victorian bodice: if the shoulder seam hangs below your own shoulders -- between 2 and 5 inches --it will match the lines of the real Victorian bodices! Also, make sure to use a thrift store blouse with long sleeves: gathered sleeves that have a cuff, or looser sleeves without a cuff. Make sure that the sleeves are long enough to reach to your wrist bone, or no more than 2 inches shorter; longer sleeves can be hemmed or cut to the proper length.

If the sleeves have an elastic drawstring at the wrists, you'll need to open the seam, cut the elastic string, and draw it out of the sleeve; if the sleeve is long enough you can even cut off the whole elastic cuff, then fold the cut edge of the fabric to the inside of the sleeve and sew or glue it in place. If the sleeve is at least 3 inches larger than your wrist, this will make an open sleeve style, or a "modified Pagoda" style in the Victorian era. If the sleeves are already loose and open at the wrists, you may not have to alter them at all, other than make them shorter, if they're long enough to hang over your hand. You can also make the sleeves narrower (with safety pins or needle and thread, taking in the sleeve seam from inside the sleeve), following the curve of your elbow and tapering gently to the wrist. Decorate your sleeves around the wrist, at the shoulder seam, and/or along the elbow seam.

Under your open sleeves, you'll need to wear under-sleeves. You can make under-sleeves, easily, by purchasing a white Oxford style long-sleeved business shirt at the thrift store, cutting off the sleeves, and wearing them underneath your blouse bodice sleeves, tying them around your bicep or making a casing for elastic, or even safety-pinning them to the inside of the shoulder seam of your bodice, to keep them in place. The white cuff of the under-sleeve, and part of the lower area of the under-sleeve, should be all that shows when it is worn under your blouse bodice sleeves. If you feel like it, you can sew or glue white lace or ribbon to the cuffs of the under-sleeves, to decorate the part that will show when it is worn.

If the blouse bodice sleeves are gathered and have a buttoned cuff (not elastic or drawstring), you may be able to leave them as they are, just decorating them, if you want. You can also get a white button-down shirt that has French cuffs (double, or folded-over cuffs), cut off the French cuffs and safety-pin, sew or glue them over the cuffs on your blouse bodice sleeves for a different look. Tuck the French cuff's raw edges under and fasten them down so they don't show. Your sleeves will add another wonderful element of style to your costume!

The official Dickens Fair costume guide
Dickens Christmas Fair website
Kay Gnagey’s 19th Century Costume Research Center
Elizabeth Stewart Clark’s Sewing Academy

Monday, November 23, 2009

Dickens Fair costuming for women, part 2: fitting thrift store garments

Cathy Decker. Image from April 1864.
Here are some costume alterations tips; your goal for the finished outfit is to achieve the same "look" as if you were making a set of historic reproduction clothing! To alter a blouse for your Dickens fair costume, you should try it on, turned inside out, over your torso support undergarment (corset or Merry Widow) and any undershirt you plan to wear underneath, in order to fit the blouse so that it looks like a Victorian bodice. To make the blouse into a fitted bodice, carefully make the blouse smaller only between the waist and bust in front, between the armpit and waist on the sides, and between the shoulders and waist in back, by pinching the fabric into vertical, symmetrical, pleats or darts, and pinning the darts in place with safety pins. Make the blouse lie as smoothly as possible, and as closely as possible to your figure, without the fabric pulling or straining. It is easier if a friend is there to help you do this (especially the back), but it can be done in front of the bathroom mirror, too.

When the pinning and fitting is done, carefully take off the blouse and, keeping the darts in place, sew the darts down on the inside of the blouse. To fasten them with fabric glue or iron-on adhesive, follow the instructions on the package, positioning the drops of glue or piece of adhesive inside the darts so that it can't be seen from the right side of the bodice (the side that will be seen when the blouse is worn). If you want to avoid sewing or gluing, you can just leave the safety pins holding the darts in place by themselves, making sure they don’t show from the outside. When you wear the blouse, tuck it in to your skirt waistband.

To alter the matching skirt, put it on over the support undergarment, your underskirt and hoop skirt (if you have one) and the fitted blouse bodice. If it is too large, use safety pins to make the waistband close as firmly as you can, or sew on a dress hook and bar. If the waistband is too small, see if you can pin or sew some matching fabric at the waistband opening to cover the gap and allow the skirt to close securely. If the skirt has a pocket or two made of the same fabric, take the pocket apart and use the fabric to fill the gap. If not, safety-pin the skirt opening closed as far up as you can, turn the gap to the back, and make sure to wear a wide belt or sash to cover your waistline when in costume. If the skirt waistline is so much smaller than your own waist, that the gap in the skirt opening can't be covered just by a belt, then you'll need to make or improvise a decorative belt with a bow, hanging ends, or a flounce at the back, big enough to cover any gaps. (Tips for making a decorative belt with flounce will be in a later post!)

Try on the skirt again, over your hoop and petticoats, and make sure that the skirt hem covers them completely, and reaches at least to your ankles. If it drags on the floor, turn the hem to the inside so that it is 2 inches above the floor, and sew or glue it in place. You can even use duct tape to fasten it in place if it will stick to the fabric of your skirt. If the skirt is too short, look for an old sheet or tablecloth in a solid color that matches or coordinates with the rest of your costume (or plain black), and cut a strip from it that is long enough to match the hem of your skirt (plus 2 inches), and 1 or 2 inches wider than you need to reach from the skirt hem (as it came from the thrift store) to a point 2 inches from the floor. You'll need to have someone help you measure when you are wearing your skirt over the petticoat and hoop (if you're wearing one). Put a 1 inch hem in one long side of the tablecloth strip using needle and thread, fabric glue or duct tape, and then sew or glue the other long edge to the bottom edge of your skirt. Also, sew or glue the short edges of the strip together, tucking the raw edges to the inside and making sure that the tablecloth strip lays smoothly and no stitches or raw edges show when you wear the skirt. You can glue or safety-pin a line of braid or other trim on your skirt to cover up the seam between the skirt and the contrasting extension, if you like. You can then use the rest of the fabric in the tablecloth to make trim for your blouse bodice, to tie it in to the design!

Sleeves, collars and accessories will appear in later posts!

The official Dickens Fair costume guide
Dickens Christmas Fair website
Kay Gnagey’s 19th Century Costume Research Center
Elizabeth Stewart Clark’s Sewing Academy

Thursday, November 19, 2009

Dickens Fair costume tips: getting "the look" of the period, for women, part 1

1857 fashion plate from Peterson's Magazine. Costumer's Manifesto.
Although you can purchase Victorian-inspired costumes from various sources, they tend to stand out as "modern" in a venue such as the Dickens Fair (or other living history reenactment), even to the uneducated eye that most of us have. The ultimate goal of wearing period clothing is to foster the illusion that you have just stepped out of a photograph from the period! There are many historic dressmakers who can be hired to make your outfit. Better garments are copied or styled from period fashion illustrations or actual period garments, made in historically appropriate fabrics, and sewn with historically accurate methods and fitting techniques. This kind of dressmaking is highly skilled work -- and it is absolutely worth the price if you have the money for it -- but a less expensive, fairly accurate compromise can be found if you can make your own outfit, and have the time to make it properly.

There are several sewing patterns on the market that will produce appropriate women’s and girls’ dresses from this time period; the majority are specialty patterns available from living history and reenacting community vendors, and on the Internet, and tend to be rather expensive. However, some of the better patterns, and vastly cheaper, are in The Fashion Historian group of patterns (Martha McCain and others) for Simplicity. Look for 99-cent pattern sales at Wal-mart, Jo-Ann's, or other fabric store.

In any case, avoid patterns for garments that look like they belong on Scarlett O’Hara or a dance-hall girl! No off-the-shoulders or cleavage-showing bodices, or bodices that look like they are corsets, "gypsy" skirts, short sleeves, dropped, or high "empire" waistlines. They belong to another time period, or on a Hollywood sound stage, not on the streets of London between 1840 and 1870, which is the setting for the Dickens Fair. Also, avoid the “colored skirt with white lace-trimmed blouse” look, as it was not worn in England during the mid-1800s; your costume should have the look of a one-piece dress, because that is, overwhelmingly, the “look” that the women and girls have in period photos and images.

If you can't sew an entire garment from scratch, you can alter garments that you find in stores like Savers and Goodwill. In thrift stores, look for dark colored, long-sleeved, front-buttoning blouses, and ankle-length, very full skirts, that match or coordinate with each other in color and pattern, that fit loosely or are at least one size too large for you. You will need to alter these garments to make them small enough to fit your torso more closely, but your measurements will be different when you are wearing your costume, so it is best to get something too big than something that "just fits". You can always make it smaller, but you can't always make it bigger ... Fitting tips will be in the next post!

Originals By Kay -- seller of fabric and some ready-to wear historic costume
Kay Gnagey's 19th Century Clothing Research Corner

Tuesday, November 17, 2009

Dickens Fair costume tips: Essential Undergarments!

Costumer's Manifesto. 1860 Crinoline, by Karl Kohler.
For men:
Male clothing of the period aimed to make the wearer look respectable, sober, well-groomed, and genteel. The clothes were supposed to fit the figure well, with none of the sloppiness or bagginess that is currently fashionable. Shirts had extra-long tails in front and back, which were always tucked into the trouser waistband and could be wrapped under the body between the legs to provide cleanliness and protection from chafing if no other undergarment was worn. Shirts were made of white linen and were considered part of the undergarments, which is why almost all of the shirt was kept covered by the coat, trousers, waistcoat, and cravat when in public!

Year-round, stockings were wool, cotton or silk (for the wealthy), what we would call "dress socks" these days, long enough to almost reach to the knee, held up with garters. In colder weather (and for the wealthier men), linen drawers could be worn under the shirt; they were about knee-length, and slightly fitted to the leg to minimize bunching under the trousers. For cold weather, knitted wool or flannel "Union Suits" were available, but none of these undergarments really changed the way the man's body looked in his clothes. That was left for the women!

It is fairly easy to approximate Victorian male underclothes for costume purposes. Modern "long johns" or boxers, and a short-sleeved white T-shirt are all you need. I recommend not wearing a tank top or sleeveless undershirt, though, because the neckline and armhole edges tend to show through your shirt if you take your waistcoat and coat off.

For women:
Female clothing of the mid-1800s created a distinctive silhouette, which depended on certain essential undergarments: the corset and petticoats. Women wore ankle to floor-length dresses with full skirts; for everyday wear, the dress bodices had high "jewel" necklines and long sleeves, and were fitted to make the torso appear smooth. A corset was necessary, and respectable middle and lower class women wore them to support and smooth the bust, torso and back. Tight-lacing, like Scarlett O’Hara did to get her 18 inch waist, was impractical for all but the wealthy, and is not necessary when you’re wearing a corset. The full skirt was held out from the hips and feet by multiple underskirts, or a hoop.

When you put together a Victorian costume, avoid just wearing your regular bra instead of a support garment like a corset, as this smooth-torso look is essential to the 19th century female appearance. Corset patterns and ready-made corsets are available, but a Merry Widow undergarment will give the modern woman a similar smooth effect. If you can't find a Merry Widow or bustier undergarment, then a bra with firm support, paired with a torso minimizer garment (one with flexible stays) can provide some of the same smoothness. As for the petticoats, you can sometimes find old wedding dresses in thrift stores, and these gowns often have an attached underskirt of tulle or netting, which can be cut from the wedding dress and worn under your costume skirt to give it some fullness. Sometimes bridal hoop skirts can be found at thrift stores, and these can be worn under your dress and underskirt; try to adjust the hoop size so that your dress skirt lies loosely over it, and avoid the “tightly-stretched” look as much as you can!

"Nineteenth-Century Fashions: a Compendium"
Cathy's Wee Victorian Fashion Page
The Costumer's Manifesto: Corsets (General Information)
The Costumer's Manifesto: Victorian Fashion Links
Elizabeth Stewart Clark's Sewing Academy

Thursday, November 12, 2009

San Francisco's Great Dickens Christmas Fair is getting ready to open!

Cathy Decker. From Englishwomen's Domestic Magazine, ca. 1865.
Despite rumors of the Cow Palace being sold to a developer, and the Dickens Fair having to move, it appears that Dickens will come back to the Cow Palace this year, the same as ever! Traditionally opening the weekend after Thanksgiving, the Dickens Fair runs 6 weekends, to the weekend before Christmas. My friends in the GBACG and I are getting our costumes in gear to attend the Dickens Fair appropriately dressed! What about you? It's not too hard to pull together a reasonably historically accurate mid-Victorian costume, although you do have to do some research so you know what to look for. Too many women just choose a long skirt and white blouse, cover it with bows and lace, and think that they have the right look!

Clothing worn during Dickens’ career openly displayed the wearer’s wealth and social standing, and often their occupation, in a way that is unfamiliar to us today. Because of the difficulty and expense of creating such high-fashion clothing today, it is recommended that women and girls assembling a mid-Victorian costume dress in a manner more appropriate to the middle and lower classes of the day. It is possible to rent suitable costumes, and also to buy complete costumes from specialty dressmakers through mail order or the Internet. The least expensive option is to put together a costume from thrift store finds, if you know what to look for, but be prepared to look through the offerings of more than one store and, especially, you should be willing to make a few alterations with needle and thread, fabric glue, hot glue, or iron-on fabric tape.

General tips: Middle and lower class women and girls imitated elements of upper class fashions, as much as their budget, occupation, and leisure time would allow. Their dresses were made of simpler fabrics like wool and cotton, in solid colors, stripes, checks, or plaids. The colors they wore were mainly muted, rather than bright or true colors, as the brighter tones were created with expensive chemical dyes. Dark colors were stylish and practical, and women coordinated, rather than perfectly matched, their accessories to their dresses. Look for neutral or muted colors in natural fabrics.

The Great Dickens Christmas Fair
The Greater Bay Area Costumer's Guild (GBACG)

Wednesday, November 11, 2009

Veteran's Day in San Jose.

Elizabeth Urbach. Veterans' Day Tea table.
So many people enjoyed the simple comfort of a cup of tea during the years devoted to World Wars 1 and 2, whether they were fighting at the front or working at home. When we celebrate Veterans’ Day, we tell the brave men and women in our armed forces that their sacrifice is valuable and appreciated, even if it goes unnoticed, or even is mocked, by the media. Pull out some things from your tea party pantry (if you have one), or take a look at my tea shopping list before you go to the store, and put together a tea party, a great way to recognize their sacrifice!

You could even take the day, see the parade (at 11 a.m.) and ceremony at Cesar Chavez Plaza in downtown San Jose, and visit the Home Front exhibit at History Park, to see some Santa Clara Valley artifacts from the 1920s through 1940s. Then return home for a Veteran’s Day High Tea.

The decorations for a Veterans’ Day Tea should be patriotic and nostalgic, with lots of red, white and blue. If you have family heirlooms from the early 1900s, like crocheted doilies, embroidered tablecloths and napkins, and vintage dishes and flatware, this is the perfect time to pull it out and use it. Play a CD of World War I and II-era songs and musical pieces for ambiance, and for dancing if you like, and try serving some foods made from period recipes. Here are some World War 1 and World War 2-era foods that you could add to your menu:

Toast Triangles
Pineapple-Apricot Jam
Raspberry Jam
Date Nut Bread
English Scones
Whole Wheat Raisin Biscuits
Buttermilk Cornmeal Muffins

Crackers and Blue Cheese
Cucumber sandwiches
Potted Ham (Spam!) and Mayonnise sandwiches
Anchovy Canapes
Potted Meat and Toast Canapes
Sardine Canapes
Jelly and Cream Cheese sandwiches
Banana sandwiches
Date-nut sandwiches

1943 Victory Cake
Baked Apples and Prunes
Jumbles
Cornstarch Pudding
Homemade Fudge

Armistice Day Tea Party
“Have a 1940s style tea party!”
“Have a real ‘high tea’ for Labor Day!”
“Tea-time 101: what do we mean when we talk about tea?”
“What should I keep in the pantry for tea parties?”
Home Front exhibit at History Park, 1650 Senter Rd., San Jose.
World War 2 video tribute on YouTube
“Recipe for Victory: Food and Cooking in Wartime” recipe collection
Foods That Will Win The War and How to Cook Them, 1918
“San Jose celebrates the 90th annual Veterans’ Day with a parade”
“Veterans’ Day 11/11/09”
“Ride VTA downtown San Jose to the Veterans’ Day Parade”
“San Jose Veterans Day Parade, other events”
United Veterans Council of Santa Clara County
American Legion Post 419, Santa Clara, CA

Tuesday, November 10, 2009

Visit the Star Trek exhibit in San Jose and then have a Star Trek tea party!


“Tea. Earl Grey. Hot.” One of the most famous lines in Star Trek history. What would Captain Picard have enjoyed with his cup of Earl Grey tea, as he planned his ship’s next move? Think about that while you visit San Jose’s Tech Museum and see the new Star Trek exhibit that opened on October 23! General admission is $25, and they recommend buying tickets in advance. The exhibit features a replica of the bridge from the original U.S.S. Enterprise, props from all of the television series and movies, and even an interactive Star Trek flight simulator! Afterwards, go home and continue the Trekkie (or Trekker) fun for a while with a Star Trek tea!

Here are some Terran (Earth) tea-table foods mentioned in one or more of the Star Trek episodes:

Earl Grey tea (hot)
Mint tea
Chamomile tea

Croissants
Brioches

Bulgarian canapes (crackers with cheese and olives)
Watercress sandwiches

Madeleines
Peach cobbler
Chocolate cake

Set the tea table in shades of gray, black, white, blue, red and yellow, with touches of metallic tones, anything that reminds you of the various sets that were part of the Star Trek T.V. shows and movies. If you have Star Trek fan paraphanalia, this is the perfect time to pull it out and show it off! If you have money to spend, there are, of course, tons of items available at the Tech Museum gift shop and on the Internet. Apparently, you can even buy Captain Picard’s tea set if you’re so inclined!

The Tech Museum of Innovation is located at 201 S Market St., San Jose, CA 95113-2008. Phone: (408) 294-8324, website: www.thetech.org. Enjoy your museum visit and Star Trek Tea!

“Earl Grey tea – Memory Alpha, the Star Trek Wiki”
“Klingon tea ceremony”
Tea – Memory Alpha, the Star Trek Wiki”
The Official Star Trek Site
“Tea. Earl Grey. Hot.” Video montage
“Kurtcu’s Star Trek discussion at Ku Day Ta”
Star Trek tea bag cosy
The Star Trek Cookbook preview on Google Books
Star Trek interactive exhibit

Thursday, November 5, 2009

Review of Stash Coconut Mango Wuyi Oolong tea.

Stash Coconut Mango Wuyi Oolong.  Photo: Elizabeth Urbach
I am currently trying to assist a family member or two in improving their diet, substituting iced tea for the various sweetened and artificially flavored cold beverages that they usually drink. One person is extremely picky about everything and “doesn’t like the flavor of tea” but wants the health benefits, so I have been experimenting with flavored oolong teas in order to avoid the characteristic “black tea” and “green tea” flavor, but keep all the antioxidants.

I purchased Coconut Mango Wuyi Oolong tea, from Stash, at Nob Hill Foods in Milpitas. The tea is packed in Stash Teas’ characteristic brightly colored foil teabags, and is pleasantly fragrant. The aroma is fruity, but only slightly coconutty, and the flavor is similar. It makes a nice iced tea, sweetened with Splenda, but doesn’t taste like typical “iced tea” and contains all the great antioxidants of real tea.

To make a pitcher of iced tea for my family with this blend, I used this recipe:

½ quart water
several cups of ice cubes
6 Stash Coconut Mango Wuyi Oolong teabags
3 packets Splenda sugar substitute

Bring the water to a boil, remove from the heat, and pour over the teabags in a heat-proof container. Steep for 4 minutes, then strain. Add the Splenda and stir until it is completely dissolved in the tea. Allow the hot tea to cool for several minutes; meanwhile, fill a two-quart size beverage container halfway with ice cubes. When the tea has cooled somewhat, pour it over the ice cubes in the container. Allow to cool completely (the ice will melt) and chill. Serve with a piece of dried mango or tiny bit of unsweetened shredded coconut in the bottom of the glass, or a squeeze of lime juice if you like!

The tea, on its own, has a nice flavor, both hot and cold. The coconut flavor is really mild and only detectable in the aroma when the tea is hot. The mango flavor is sutble, as well, but ads a nice element to the oolong. We went though a box of this tea fairly quickly – since it takes 6 teabags to make 2 quarts of iced tea – and I’ll probably be looking for this more in the future, although my family was not in love with the flavor, because it doesn’t taste like juice or soda!

Stash teas can be purchased at most major supermarkets in the San Jose area; I purchased Coconut Mango Wuyi Oolong tea at Nob Hill in Milpitas.

Sunday, November 1, 2009

More Victorian events in San Jose this season!

image from Nikolay Dimitrov, www.e-Cobo.com
Afternoon Tea and Ornament Making: Sunday, November 15th, 1:00-5:00pm. At a private residence in San Jose*. RSVP to Miranda at eurohaus@earthlink.net. Please note: Because of materials and limited table space, you must RSVP for this event. This event is limited to approx 15 crafters, so please RSVP right away. “Please join us for a lively Autumn afternoon of taking Tea and making Victorian Ornaments. The ornaments we are making are to support and raise funds for the operating budget for the Andrew P. Hill House. We hope to participate in the Heritage Holiday event on Dec 6th, where the VPA will have a table at the crafts faire and sell the ornaments. All the supplies needed to create ornaments will be present, but you are welcome to bring your favorite pair of scissors, or scrapbooking tools to help you create works of art. If you have doilies, ribbon, lace or other bits n bobs that you would like to donate to the cause, please feel free to bring them (we would appreciate that). This event is free. We're asking that everyone bring a potluck contribution to the tea table. Tea will be in the English style, so think cucumber sandwiches, scones, lemon curd and such. If there is more interest, we may be able to accommodate more. *location will be sent to you upon receipt of your RSVP. Hope you can make this fun filled afternoon!”

Hill House Docent meeting: Sat Nov 14th, 10:00am till noon, Firehouse (upstairs) at History Park, 1650 Senter Road, San Jose. “Ever wonder what it takes to be a docent? Please come to the Docent meeting where all this (and more) will be discussed. We’ll meet in a comfortable casual atmosphere and learn more about the wonderful world of Docenting from Barbara Johnston. We’ll also chat about the upcoming Docent training session, where you can learn all you need to know to get involved in this fulfilling experience. What can possibly be more rewarding than sharing the beautiful Hill House, and its rich history with an appreciative public. Please pop an email or phone call to Miranda to let us know you are coming.”

Help man the table at Heritage Holiday: Sat Dec 5th from 12:00 noon till 5:00pm, at History Park, 1650 Senter Road, San José, CA 95112. (408) 287-2290. www.historysanjose.org Spend an afternoon celebrating the holidays in old fashioned Victorian style. There will be crafts for sale and other activities. We are looking for a few volunteers to help Diana and Hullene to sit at our table and sell the ornaments and other items to raise money for the Hill House operating fund. It's just a few hours spent in the festive atmosphere of History Park. Please contact Miranda if interested in helping out. Thanks!’

Saturday, October 31, 2009

Fun local things to do this weekend!

image from the Halloween Cavern of Clipart.
Well, Halloween has come around again, can you believe it? Lots of kids will be trick-or-treating tonight, but adults don't have to feel left out of the fun. Even if you don't like traditional Halloween parties, you can throw a Halloween (or Autumn, if you don't care to celebrate Halloween) tea party for yourself and some friends! The menu can include cookies, sandwiches, and scones cut with Halloween or autumn-themed cookie cutters, or decorated according to theme, for fun.

Then, there are the seasonal activities. In San Jose, a few options exist:

Haunted History: Saturday, October 31, from 1 to 4 p.m. History Park, 1650 Senter Rd., San Jose, CA 95118. Admission: $2 per person or $5 for four people. Please bring non-perishable food donations for the Second Harvest Food Bank. "Join us for an old fashioned, scare-free Halloween party -- a fun, safe, and family-friendly experience for all. Trick or treat at the historic houses in the park. Costume parade and contest. Trolley rides. Wrap-a-mummy contest. Jack-o-lantern contest. Halloween Story Time." http://www.historysanjose.org/calendar/091031hauntedhistory.html


San Jose Women’s Club Holiday Bazaar: Saturday, October 31 and Sunday, November 1, 2009. 9:00 am–4:00pm. Location: 75 South 11th Street, San Jose, CA 95112. (408) 294-6919 • info@sjwomansclub.org. On Sunday, from Noon–2:00 pm, $5 per item, Steve Yvaska,“The Antiques Advisor” for the San Jose Mercury News and author of the Seasoned Collector, will appraise items.* *Some antique categories may not be appraised. Admission: $1.00 or 1 can of food for Second Harvest Food Bank. Free street parking or paid parking at the S. 10th St. and E. San Fernando St. Garage.

Whatever you do, stay safe and have fun!

"How to give a Halloween tea party"
"Slightly spooky savory black olive scones."

Tuesday, October 27, 2009

2010 Tea in London Tour


One of my tea world friends from an e-mail discussion list, Denise LeCroy, writer of the Uniquely Tea blog, is advertising her next tea tour. Because some of the readers of this blog are located in the U.K., I thought you all might be interested in reading about Denise's tours in England.

"Do you have a passion for something, or perhaps a passion for several “somethings”? Hello! My name is Denise LeCroy and I have several passions – tea, travel and London.
Several years ago, I married a man from London and left the United States to live with him in that most glorious of cities. I had visited London before with friends, but living there was a dream of a lifetime. I think I dragged my poor husband to every tearoom, tea shop and tea event in London during those years!

When we returned to the states, I settled into married life on this side of the pond and the days and weeks proceeded smoothly until a routine mammogram showed an abnormality that turned out to be breast cancer. Early detection saves lives. Surgery and radiation followed immediately, all went well, and today I celebrate being four years cancer free.

Throughout those soul-searching months of recovery my illness forced upon me a new perspective on many things…life, relationships, what matters and what doesn’t matter. I was given a second chance and was reminded that it was time to dust off my dreams and goals and aspirations that had been neglected for far too long.

I thought about my passions and how I wanted to further pursue them. I already had been a local tea educator for quite some time and although I was also a seasoned traveler, I studied to become a London Destination Specialist. I realized that London’s rich tea history was being virtually neglected by the travel industry, and so I started Tea in London tours - the perfect combination of my love for tea, travel and London.

English Afternoon Tea at traditional and non-traditional venues is a daily event on our tours, together with a combination of other unique activities that include guided walks through areas in London where the tea trade once ruled England’s commerce; visits to museums and galleries to discover old and new tea treasures; journeys to gardens and ancestral homes of early English tea drinkers; and much more. (I can assure you that if one digs deep enough - and I have - one can find a tea-connection to almost anything in London!)

We use a charming hotel in Bloomsbury as our base. It’s a great, quiet location. All of our transport is on a private, comfortable air-conditioned coach and my favorite London Blue Badge Guide, Sarah, accompanies us every day. She loves tea, and you will love her. But Tea in London is not strictly for tea lovers as we encounter many of London’s famous places and landmarks. Opportunities for shopping are built-in, as well as a free day to privately experience London.

The next Tea in London tour is scheduled for September 13-18, 2010 and I am happy to announce that it will include an optional full-day Tea Masterclass with tea expert Jane Pettigrew. I invite you to visit our website http://www.TeaInLondon for more information about the Masterclass and about the tour. I hope 2010 will be the year that you have Tea in London!
###
If you would like more information about this topic, or to schedule an interview with Denise LeCroy, ring 843.901.0642 or send an email to admin@teainlondon.com"

I can't afford to travel these days, but if you are in the London area, or you have enough spare cash to join this tour, I hope you have a wonderful time!

Tuesday, October 20, 2009

How about some homemade orange spice tea?

So many people associate the scent and flavor of spiced oranges with the fall and winter season. Making old-fashioned clove oranges is a lovely pastime that results in a natural and decorative air freshener for the home, but also a delicious garnish for punches, hot beverages, and teas like the blend below. Orange spice tea is one of the most popular blends for cold weather, at least in the United States, but most people purchase theirs, and are unaware that it is a fairly simple recipe to make at home. With all due respect to Bigelow tea company and their classic Constant Comment blend, here is a homemade version:

Homemade orange spice tea (by the pot):
4 cups water
1 tablespoon black tea
1 tablespoon orange marmalade, plus extra
5 whole cloves, plus extra
1 whole cinnamon stick

Bring the water to a rolling boil. Place a tablespoon of loose black tea in the bottom of a warmed teapot, with one cinnamon stick and 5 whole cloves which have been bruised or cracked. Add one tablespoon of orange marmalade. Fill the teapot with boiling water, cover, and allow to steep for up to 5 minutes. Strain into cups and enjoy. Using the same tea leaves and spices, but adding up to 1 tablespoon orange marmalade each time, you can get up to 4 teapots of orange spice tea.

Not only will you have a delicious and popular hot beverage, you can adjust the amount of orange and spice to suit your own taste! Serve with a thin slice or wedge of fresh orange, with 2 or 3 whole cloves pushed into the peel.

Monday, October 19, 2009

Hot tea for cool weather.

tea house at Japanese Friendship Garden, San Jose CA.
It seems that this month has been cooler, temperature-wise, than past Octobers, although I remember one Halloween where the kids were complaining that it was too hot to wear their costumes when they were trick-or-treating, and I thought it was warmer than normal. Maybe it's just now getting back to normal October temperatures! Whatever the reason, the cool weather always makes me want to bake and enjoy cup after cup of hot tea, and I recently bought some really nice loose-leaf jasmine green tea. I have been a long-time fan of savory Japanese soy crackers and green tea cookies, so I'll be pulling a few of these items together, with some sushi from Kazoo Sushi in Japantown, for the South Bay Ladies' Tea Guild's Japanese Tea Garden Picnic. Let's hope for warm, sunny weather this weekend!

Japanese Tea Garden Picnic: let’s enjoy the cool shade in San Jose’s Japanese Friendship Garden, with a picnic in the grove by the koi pond. Gentlemen and older children welcome!
Date: Saturday, October 24, 2009, 2 p.m.
Location: Japanese Friendship Garden, Kelley Park, Alma and Senter Rd., San Jose.
Cost: $20 (members)/ $25 (non-members)
Suggested Costume: Japanese-inspired.

As always, please R.S.V.P. and buy your ticket at least 48 hours in advance (by Thursday, October 22) so I know how much sushi to get. I don't eat raw meat, so I'll be getting vegetarian sushi, and maybe some Spam sushi. E-mail southbayladiesteaguild@yahoo.com for the address to send your check, or if you prefer PayPal, I have an account at eurbach@yahoo.com.

I would have loved to be able to use the tea house in the garden, but unfortunately, it's not open to the public. The city of San Jose uses it for a meeting and conference center and they don't rent it out to anyone -- although I have heard of non-profit groups being allowed to have events there. The person I talked to wouldn't let the Tea Guild in, so we'll have our tea and picnic outdoors. I'll bring the few Japanese decorative items that I have, given to me years ago by Rie Hanu, who was a Japanese exchange student who stayed with my family one summer when I was 8 years old. I have a few dolls and a kid-size kimono and obi that I will bring for display. Hopefully we'll have some beautiful California weather for our picnic!

Monday, October 12, 2009

Columbus Day Italian tea party!

Italian tea plate with figs, Stella d'Oro cookies, Sicilian Orange marmalade, Blood Orange soda, and Earl Gray tea.
Most Italian-Americans don’t see Columbus Day as a celebration of the subjugation of native peoples, as many others do, because Italians have experienced their own share of subjugation at the hands of foreigners, over the yeas, and they know that's nothing to celebrate. For them, Columbus Day is a memorial to Cristofero Colombo, one of the “little people” (i.e. common Italian, not foreign aristocrat) who had big ideas, and who braved ridicule, danger, poverty and complete ruin to bring his idea to life. The day is also a memorial to, and celebration of, the other Italians who have done the very same thing, repudiating the easy life of crime, and making a better life for themselves and their families through hard work, faith and dedication.

While Italy is better known as a coffee-drinking country, tea has a long-standing, although small, presence in the hearts of many Italians, both in Italy and in the wider world. Italian-Americans comprise 6% of the U.S. population (as of 2006), the 4th largest European ethnic community in the United States, as passionate in their love of food, family, culture, and community as they ever have been. These are values that all cultures can share and celebrate, so what better way to do that, than with an Italian-inspired tea party on Columbus Day?

Italian Tea Party menu:
Antipasto plate -- green & black olives, pickles, salami slices, prosciutto slices, peperoncini, sweet yellow peppers, pickled baby corn, marinated artichoke hearts.

Earl Grey tea (bergamot is grown in Sicily)
Italian mineral water
Orange or Pomegranite Juice with sparkling water

Foccacia topped with melted mozzarella, sauteed portobello mushroom and onion
Open-faced tuna salad sandwiches on ciabatta bread, with sliced fresh tomato and basil
Roast beef and roasted red pepper tea sandwiches with Parmesan cheese
Zucchini bread
Mushroom Bruschetta
Eggplant, Tomato and Mozzarella Panini

Grapes, figs, blood oranges and melon balls in sugar syrup flavored with rose water
Dates stuffed with Mascarpone cheese or Stilton
Biscotti, amaretti, cuccidati, or Stella d'Oro cookies
Sliced Strawberries marinated in Balsamic Vinegar, Sugar, and Pepper
Jordan almonds

“Belguardo for refined relaxation Italian-style: Afternoon tea and Italian delights”
“Tea in Tuscany” by Mary Caliendo
“Tea’s popularity grows in Italy” by Jane Pettigrew, Tea & Coffee Trade Journal
"Columbus: fact vs. fiction"
"Columbus: a biography"
"Columbus and the Indians: friend or foe?"

Tuesday, October 6, 2009

_Gourmet_ magazine to close down!

homemade Meyer lemon curd.
This just in: Gourmet magazine will be discontinued as of the November 2009 issue, after a continuous run of 69 years! This magazine has been almost a cooking bible of sorts to many people, and although I never subscribed to it, I bought my fair share of issues from the grocery store magazine racks. One of my favorite recipes, indeed the only one I use to make lemon curd from local San Jose Meyer lemons, comes from Gourmet magazine, courtesy of the Epicurious.com recipe web site. Here is my adaptation of the original:


Meyer Lemon Curd:
½ cup fresh Meyer lemon juice
zest from 2 to 3 Meyer lemons (or, to taste)
½ cup sugar
2 large eggs
1 stick unsalted butter, cut into 4 to 6 pieces

Choose bright yellow Meyer lemons, since they’re sweeter than the lighter ones. Juice and zest them yourself right before you make the lemon curd for the best flavor. Put a few inches of water in a medium saucepan and bring to a simmer. Combine the zest, juice, sugar and eggs in a non-reactive metal bowl, and set over simmering water. Stir continually with a whisk until the mixture is warm to the touch, and then add the butter. Cook, whisking, until thickened and smooth and all the butter is melted and mixed in, and then continue to stir and whisk for 5 minutes more. Force curd through a fine sieve set into another bowl, if desired. Seal in sterilized jars, serve warm or cover surface of curd with wax paper and cool completely. Store in the refrigerator for about a week, or freeze, sealed from the air, for up to a few months. Makes 1 ½ to 2 cups.
-- adapted from Gourmet magazine, December 1999.

Meyer lemons, which are sweeter than regular lemons, do not work well in traditional lemon curd recipes because they contain more sugar, to compensate for the standard lemon tartness. This recipe makes a wonderful, silky lemon curd that doesn’t overshadow the delicate floral flavor of the Meyers. It is one of my favorite recipes, and a favorite one with the Ladies' Tea Guild members, as well as my colleagues at work, who each got a jar of it last spring as a thank-you gift when they did me a favor!

“Conde Nast boots Ruth Reichl, closes Gourmet magazine”
“Gourmet: RIP”

Saturday, September 26, 2009

How about some frozen lemon curd and cream?

image from PublicDomainPhotos.com
It has been so hot this last week that I came up with a frozen dessert recipe! Now, I love ice cream but I don't have an ice cream maker, so I am usually able to control my ice cream consumption by only purchasing one small pint of real ice cream every once in a while, and keeping fat-free fudgesicles or popsicles in the freezer for the rest of the time. But now, there is real ice cream danger!

In preparing for the South Bay Ladies' Tea Guild's Tea with Rhys Bowen, I made a bunch of lemon curd and stirred it into whipped cream, to use as a filling for miniature tarts, topped with fresh berries. I ended up making much more than I needed for the tarts, and the rest of it sat in the fridge for several days until I was afraid it would go bad. Then, it struck me: lemon curd freezes well, so will this lemon curd cream freeze well? Boy, does it ever! Especially if you put it in popsicle molds! The danger is, it's too easy, so I'll be making (and eating) this more than I should! Here's how you make frozen lemon curd cream:

2 pints heavy whipping cream (organic, if you can get it)
2 cups homemade lemon curd (I used Meyer lemon curd)

Whip the cream to soft peaks, then slowly drizzle the lemon curd from a spoon (homemade will do this, you'll have to soften it if you use store-bought) over the cream as you continue to beat it. After you have beaten in the first cup of lemon curd, slow down the beating as you drizzle in the rest of the curd. The cream will not whip to stiff peaks, but should retain a light, mousse-like consistency. Use to fill tart shells, topped with sugared fresh berries, or fill re-usable popsicle molds or the small bathroom-sized Dixie cups. Insert popsicle sticks into the center of each lemon cream-filled mold, cover with plastic wrap, and freeze solid.

To serve, remove from the freezer, remove plastic wrap, run warm water over the outside of the mold to loosen the frozen pop, remove from the mold and enjoy! You can also just spoon the unfrozen lemon curd cream into a sealable freezer container, and freeze until slushy, and then serve. You'll have to break it up if you let it freeze solid, but the heavy cream in it will keep it from getting too hard. How easy is that? Dangerously easy!

Friday, September 18, 2009

Did you make it to the Antique Car Show in San Jose last weekend?

image from ClipartETC.
If you didn't, a couple of nice people took some video of the event and posted it on YouTube.

And this one is about 3 minutes long: http://www.youtube.com/watch?v=5sPNLmRM9js&feature=related

Fun! Wish you were there!

Wednesday, September 16, 2009

Elizabeth Gaskell to be honored at Westminster Abbey.

image from Clipart ETC.
Along with many of you, I really enjoyed watching the recent adaptation of Elizabeth Gaskell's work, Cranford, which was broadcast on KTEH and KQED in this area last year. It turns out that Elizabeth Gaskell is about to be included -- with Oscar Wilde, Charles Dickens, and other 19th century English novelists -- in a memorial window in Westminster Abbey, overlooking Poet's Corner. I wish I could be there to see it! Here's the link: http://www.independent.co.uk/arts-entertainment/books/news/mrs-gaskell-gets-her-place-in-the-sun-1786618.html

Maybe the South Bay Ladies' Tea Guild needs to have Tea with Elizabeth Gaskell when the new Cranford Christmas special is broadcast ...

The Gaskell Society
The Elizabeth Gaskell House in Plymouth Grove
Wikipedia entry for Elizabeth Gaskell
Elizabeth Gaskell's pages on the Victorian Web
Cranford at Internet Movie Database website

Thursday, September 10, 2009

Review of Buccaneer blend loose tea from SerendipiTea.

I recently received a sample of this tea blend and have really been enjoying it. The Buccaneer blend contains Fair Trade certified organic black tea, chocolate, coconut, vanilla and rooibos. The first aroma that I noticed upon opening the foil pouch was the toasted coconut, with a little hint of vanilla and chocolate and the kind of citrusy fragrance of rooibos. When brewed and served hot, the flavor of the tea blend changes slightly; I thought it tasted mostly of toasted coconut and rooibos, and couldn’t really taste the chocolate and vanilla. On a second and third brewing, the chocolate and coconut are very much in the aroma, but the vanilla is still hiding behind them, I suspect. The black tea flavor wasn’t there at all for me, and I had to look at the tea leaves themselves to make sure they were there. Sort of disappointing for me, as I expected the black tea to make the blend taste more substantial. On a second and third brewing, I detected the black tea as a faint presence behind all the other stronger flavors, but not as a distinct flavor in itself. I tend to want my tea – even flavored tea – to taste at least a little bit like “tea”, but I may be alone in my preference. All in all, still a tasty blend, which can withstand 2 infusions per serving. I’m not sure this blend is one of those that tastes equally good as a hot beverage and a cold one; I drank some both freshly brewed and after it had cooled, and I prefer this blend hot, definitely. The chocolate flavor really needs the heat in order to have a presence, I think. But as a hot drink, with a flavor of the tropics, the Buccaneer blend is a good one.

1.888.TEA.LIFE
www.serendipiTea.com

Monday, September 7, 2009

Having tea parties is easy if you have a tea pantry!

image from ClipartETC.
This is an article I wrote for another website, but it answers a question that several people have asked me: "Isn't it a lot of work to put on a tea party?" Not if you keep it simple and prepare in advance; while it is a lot of fun to put on a big, fancy, to-do, it is also easy to get carried away! In order to be able to pull together a simple tea party with minimal stress and planning -- even at the last minute -- it’s a good idea to keep certain items and products in the house, set aside in what some people call a “tea party pantry” so that they don’t get used for anything else and are there when you need them. Keep them wherever you have space, but label them and make sure you can find them at a moment's notice. Apart from tea, a kettle, tea pot, mugs or cups and saucers, and a tea strainer, your tea party supply collection can contain any or all of the following:

1. some bottled water, if your tap water is full of minerals or bad-tasting (it will affect the flavor of the tea)
2. sugar cubes
3. packaged fancy cookies
4. store-bought jam and lemon curd
5. imported clotted cream, or Mexican crema or table cream (in the International food section in some grocery stores)
6. packaged scone mixes
7. dried cherries, cranberries, currants and/or apricots
8. store-bought chutney, tapenade, and gourmet spreads or sauces
9. boxed cake mixes, pudding mixes, and canned pie filling
10. confections like chocolate chips and candied ginger
11. cream cheese and unsalted butter, which you can store in the freezer
12. loaf of pound cake or fruit cake, sliced, which you can store in the freezer
13. frozen appetizers like mini quiches, mini veggie turnovers, rolled sandwiches, and turkey sausage
14. frozen puff pastry, pie dough, crumpets and tart shells
15. frozen desserts like mini cream puffs, mini eclairs, and ice cream bonbons

With all of these things, you only have to buy fresh sandwich bread, cucumber, milk (to put in the tea), and some seasonal fruit and flowers, and you're ready for tea! For a traditional afternoon tea, you’ll need bread (scones or crumpets) with jam and cream, savories (tea sandwiches and other savory bites), and sweets (desserts). For a cream tea, you’ll only need scones with cream and jam, and maybe one small dessert. Keep everything small and dainty in size, trim the crusts off of all bread slices for toast and tea sandwiches, and avoid overly messy finger food. (Hot wings are too messy for a tea party!) Here are some suggestions using items from the above list:

Bread: scones (from a mix), frozen or packaged crumpets (heat in the toaster) or toast – trim off the crusts and cut into triangles. You can add dried fruit, chocolate chips, or chopped candied ginger to the scone mix before baking. Serve with clotted cream, table cream or whipped unsalted butter, jam and/or lemon curd.

Savories: cucumber sandwiches, sausage rolls (puff pastry strips filled with sausage and baked), chutney or tapenade spread on toast rounds or squares, frozen mini appetizers (defrost and bake as needed), or cream cheese mixed with some spicy gourmet sauce and used as a sandwich spread.

Sweets: packaged cookies, cupcakes (boxed cake mix), tart shells filled with pie filling or pudding, sliced pound cake or mini desserts (thaw as needed), pie dough or puff pastry turnovers filled with jam or pie filling (bake as needed), or frozen ice cream bonbons.

Thursday, September 3, 2009

What to do with fresh peaches? Have them with tea!

1895 "Berry" peach from Wikipedia.
While peach season is technically in August, they are still available in September around San Jose! Don’t forget to enjoy them right now, either fresh (with cream and sugar), or made into savory dishes and salsas to accompany meat, and many delectable desserts. Why not even give a tea party featuring peaches? You can purchase any one of the many peach flavored tea blends available in the supermarkets or online, or you can make your own. I suggest a nice Taiwanese oolong tea as the base for your peach tea.

To make your own peach tea at home, you should have:
  • fresh or dried peaches, or peach juice
  • granulated sugar
  • fresh water
  • unflavored oolong tea (from Taiwan, if you can get it), or other unflavored tea
First, fill your kettle with fresh water and put it on to boil. Meanwhile, pour hot tap water into your teapot, swirl the water around inside to warm it, and set it aside for a few minutes. If using dried peaches, chop them into small pieces. If using a fresh peach, take out the pit and chop it into small pieces, then sprinkle a few tablespoons of sugar over the fruit and let it sit for a few minutes. When the water in the kettle boils, take it off the heat. Empty the hot water out of your teapot, and measure 1 tablespoon of tea leaves, and at least 1 tablespoon of chopped peaches into the teapot. Pour the just-boiled water over it and let it steep for 3 minutes, then strain into teacups. You can add some more peach pieces to the bottom of each teacup before you pour in the tea, if you want. If using peach juice, omit putting peach pieces into the teapot with the tea, and brew the tea as usual. Strain the peach juice through cheesecloth, if desired, to remove the pulp, and add a teaspoon or two of juice to each teacup after you've filled it 3/4 of the way with tea. Add more peach juice or sugar as desired, to flavor the tea, and enjoy!

Here are a variety of menu choices for your own Peach Tea party!

Oolong tea or Peach flavored tea

Clotted cream or Mexican crema
Peach jam
Peaches and Cream Scones

Grilled Peaches Wrapped in Prosciutto
Peach mint salsa on crostini
Sliced peach and turkey sandwiches

Peaches and cream
Peach cobbler
Individual Peach Pies
Peach ice cream
Peach pound cake

More links:
“Tea tasting 101: characteristics of good quality oolong tea”
“What should I keep in the pantry for tea parties?”
“Which foods go with oolong or pu-erh tea?”
Peach Iced Tea recipe
Prize-winning Peach Pie recipe
Pickled Peaches recipe
The Lady & Sons Peach Cobbler recipe
Now stir the fire, and close the shutters fast,
Let fall the curtains, wheel the sofa round,
And, while the bubbling and loud-hissing urn
Throws up a steamy column, and the cups
That cheer but not inebriate, wait on each,
So let us welcome peaceful evening in.
-- William Cowper (1731-1800)
"The Winter Evening" (Book Four), _The Task_ (1784)