The Ladies' Tea Guild
Showing posts with label 1860. Show all posts

Friday, May 1, 2015

Back to costuming: the mid-Victorian sheer dress.

Original sheer muslin dress, 1840s.
Old Sacramento Living History Museum.
Mid-Victorian daytime fashions were not all about heavy, opaque fabrics; warm weather allowed for light dresses of semi-transparent fabrics like muslin and barege, trimmed with embroidery, ribbons and lace for a cool, floating visual effect.  These gowns, called sheer dresses, or "clear muslin dresses", were especially popular at seaside and tourist resorts, during the 1840s through the 1870s.  They were worn for morning, afternoon and evening, changing the bodice style, and were popular in England and North America, as well as when visiting warmer climates like Italy.  These followed the lines of mainstream fashion, but included characteristic features such as shorter sleeves, lower necklines, partial bodice linings, and depending on the transparency of the fashion fabric, separate colored under-dresses.  This article, first published in the Greater Bay Area Costumer's Guild's newsletter, Finery, will focus on day or afternoon styles for these dresses. 


Monday, May 28, 2012


Golden Gate National Cemetery, So. San Francisco, CA.

While the main conflicts of the Civil War occurred far away from San Jose, California did participate in the fighting, with local skirmishes between Union and Confederate sympathizers.  California was split between North and South in its sympathies, with more Confederate sympathy in southern California, and more Union sympathy in the North.  Since the gold fields were in Northern California, the Union received large donations of California gold, which greatly supported the war effort.  California’s brand-new state legislature also sent multiple companies of men to serve in the Union army, most ending up replacing more experienced soldiers stationed at army forts in the Midwest, but several seeing action on the front lines by joining up with Massachusetts and other Northern states’ militias.  The conflict split the nation in more ways than one, and the scars from those wounds are still sore in some areas of the U.S.!

Thursday, November 24, 2011

Thanksgiving Day.

Image: http://clipart.edigg.com 
"THANKSGIVING DAY.—When shall it be? The last Thursday in November falls on the 29th.  We petition each and all the State governors to appoint that day for our national rejoicing.  Then all the land will be glad together and union among the people would be a sure pledge of heart-thankfulness to God, who has given to us, as a nation, such wonderful prosperity, such universal blessings.
The readers and friends of the “Lady’s Book,” that is, a large majority of the people of these United States, agree in our petition.  Let us have a national day of Thanksgiving on Thursday, the 29th of November."  Godey's Lady's Book, October 1855.

Sunday, June 26, 2011

Godey tells us why we should wear real flowers instead of fake ones.

La Mode Illustree, 1867.
“Natural Ornaments.

‘The month of roses’ reminds us how few ladies make use of the most charming of all ornaments for the hair and dress, natural flowers.  They load themselves with impossible clusters of muslin roses and jessamine, with dangling pendants of glass and wax, called jet and coral by courtesy; they flash bugles and spangles into your eyes with every turn of the head, while the pendant wreaths of the Spicra Reevsi, and the graceful racemes of the laburnum and the ‘bleeding heart’, or the perfumed cups of the valley lily, are perishing, unnoticed, in the lawn and garden.
But they fade so soon?
A little experience and judgment will teach you how many blossoms will outlast the evening, and what foliage will shade them most effectively.
They are only suited to young girls?
from Lise's Garden clipart
Some of them may seem more appropriate for maidenhood, it is true; but must the young wife forego the tuft of snowy hawthorn, or the crimson petals of rose and carnation?  the glossy ivy leaf, and the fragrant tips of the arbor vitae and ground laurel?  A single spray of rosebuds, a branch of golden-hued laburnum, or snowy acacia, is far more effective as an ornament, if tastefully disposed, than all the stiff, glittering, hollow, gaudy baubles that one could find at Bordman’s or Crenange’s.  Try it for your next party, and do not ask your intimate female friend, or your showy neighbor, with her diamond spray, what the effect is, but depend on the judgment of your husband or lover.” 
-- from Godey's Lady's Book, June 1860.

Saturday, June 25, 2011

Beauty tips from "Aunt Deborah", Civil War-style.

Godey fashion plate, 1860.  The Costumer's Manifesto.
A COMMUNICATION FROM AUNT DEBORAH.
I dare say many ladies will set me down for a very plain and old-fashiond person, when I say that, for cleansing and softening the skin, the most simple and the most useful articles are soft water and soap, followed by the use of a coarse cloth.  Rain-water is the best, but most water may be rendered sufficiently soft by putting into it a small pinch of the washing or bleaching powders now so much in use.  Soap, in addition to a proper proportion of alkali, should contain so much oily matter as may mechanically soften the skin and promote its smoothness.  I will furnish a receipt or two for the manufacture of suitable soap, or wash-balls, though good almond or Castile soap will generally answer the purpose.  The process will be rendered still more easy and pleasant, if lukewarm water be used instead of cold, but a final rinsing in cold water will be an improvement. 
-- from Godey's Lady' Book, February 1860. 

Tuesday, March 29, 2011

Another Victorian spring activity: making potpourri.

Violets.  Photo: Nikolay Dimitrov.
This is from the February 1860 issue of Godey's Lady's Book:

"A pot pourri, as it is called, if properly made up, forms an elegant and beautiful perfume, though it costs some months to complete.  You should begin it while the violets are in bloom, as they add greatly to its excellence.  There are, however, plenty of flowers that are available.  Get a china jar four or six inches deep, with cover.  Prepare layers of damask and other sweet-scented rose-leaves and buds, also layers of orange-flowers, if you can obtain them, jessamine, lavender-flowers, clove-pinks, sweet-scented stocks, marjoram, orange-mint, lemon-thyme, balm of Gilead, and rosemary.  Have some orris-root sliced, and the outer part of the rind of Seville oranges.  Have also a few cloves reduced to powder, and small quantities of benjamin, storax, and musk, and some bay salt, all in fine powder.  Mix the powders and the salt well together; then put a layer of leaves, as you collect them, into your jar, sprinkling each layer with a portion of the powders, and so proceed till your jar is nearly full;  stir all together now and then, press firmly down, and cover close.  When the cover is taken off in a warm room, a very agreeable scent will be diffused." 
Carnations, or Clove-pinks.

Wednesday, June 23, 2010

Stewed Peas: proof that the Victorians ate their vegetables (at least during the spring and summer)!

This is from Godey's Lady's Book of 1860, the May issue or thereabouts. I love peas, and I happen to have some in the freezer, so I may be making this sometime soon!

Stewed Peas.

Take very young, tender green peas, and put into a stew-pan, with sufficient fresh butter to keep them from burning, but no water; season them with a little black pepper and a very little salt; set them over a moderate fire, and stir them about till the butter is well mixed through them; let them simmer till quite soft and slightly broken, taking off the lid occasionally, and give them a stir up from the bottom; if you find them becoming too dry, add some more butter; when done, drain off what superfluous butter may be about the peas, and send them to table hot. They will be found excellent. To the taste of many persons, they will be improved by a lump or two of loaf sugar put in with the butter, and also by a few sprigs of mint, to be removed before the peas go to table. Lima beans may be stewed in butter, as above; also, asparagus tops cut off from the white stalk.

Not that I need that much butter in my diet, though!

Saturday, February 13, 2010

Victorian-inspired recipe: Coconut Rose-water Bread Pudding, version 1.

I dug out my flavorings the other day and decided to try interpreting the Coconut Pound Cake recipe from Godey's Lady's Book as a bread pudding. Here's the recipe:

Coconut Rose-water Bread Pudding

8 slices stale sandwich bread (I used potato bread)
2 eggs
1 cup coconut milk, plus extra
1 cup 2 % milk
1/2 stick unsalted butter, softened, plus extra
1/2 cup granulated sugar
1 cup sweetened flaked coconut
1 teaspoon rose water

Butter an 8-inch square baking dish and heat oven to 350 degrees F. Butter 4 slices of bread and fit them into the bottom of the dish (I didn't trim the crusts but the bread would have fit better if I had). Cover with coconut and sprinkle with a light dusting of sugar. Repeat with another layer of buttered bread, coconut and sugar. Beat the eggs in a bowl, then add the coconut milk, dairy milk, rose water and any remaining sugar. Beat well to mix, then pour over the bread, making sure to soak it well. Add a bit more coconut milk to the bread in the dish as needed, to soak every little corner. Let sit for 10 minutes or so to soak up the custard, then bake for 30 to 45 minutes or until custard is set and coconut on top is browned. Makes 4 to 6 servings.

Well, I discovered that coconut milk isn't very flavorful, and while the pudding smelled great as it baked, it had very mild flavor. I cut the coconut milk with dairy milk because I didn't want it to be overwhelming in its coconut flavor, but I think that was a mistake. Next time I make this, I will try to use all coconut milk, and even add some extra coconut flavoring if I can get it, or some vanilla, and a little more rose water. Or maybe fresh lemon zest. But this has potential!

Wednesday, January 20, 2010

A Victorian recipe reborn: bread-and-butter pudding.

It has been really rainy, windy and cold these past few days, and we have had lightning and thunderstorms almost every day. I got wet to the skin from the knees down yesterday when I went in to work, but although I like my job I'd prefer to stay home during weather like this! Especially when there are interesting recipes in my antique cookbooks, that are begging to be tried. I especially like to bake when the weather is cold, so last weekend, and again yesterday, I pulled out the books and got to baking. One recipe that all of my old cookbooks seem to have, in at least one version, is bread pudding. I've made savory and sweet bread puddings before but never simple old bread-and-butter pudding. The recipe I used was from Godey's _Lady's Book_ from 1860, but I cut the recipe down to two servings. Here is the original recipe:

A Very Nice Bread Pudding.
Take three slices of bread; lay them in a deep dish; make a custard of one quart of milk and four eggs, sweeten to the taste, and flavor with lemon; pour the custard over the bread without stirring. Bake twenty minutes. Grate a little nutmeg on top. This is the finest bread pudding I have ever eaten. The white of the eggs beaten separately and put on top is an improvement, with a little jelly.

Of course, they don't tell you how big the slices of bread should be, nor how hot the oven should be! Many other old recipes I've seen have currants sprinkled over the bread, and with bread-and-butter pudding, the bread is buttered before being soaked with custard. I decided to alter the Godey's recipe to be more in line with other Victorian bread-and-butter pudding recipes. I also tried cutting the crusts off the bread and just using the crumb for the pudding, and it made a big difference in the texture. Here is the recipe I ended up with:

Victorian-esque Bread-and-butter Pudding.
4 slices of French or Italian bread (fresh loaf from the supermarket bakery, a few days old)
4 tablespoons of unsalted butter
3 regular eggs
1 pint of whole milk, plus extra
a handful of dried Zante currants
a few tablespoons of granulated sugar, plus extra
the zest from half a fresh lemon (I used Meyer lemon, because we have a tree)

Butter a small baking dish with some of the butter on a piece of waxed paper (the wrapper from the stick of butter is the best). My dish holds about 4 cups. Cut the crusts off of the bread slices and fit two of them into the bottom of the dish. If your butter is soft enough, butter the bread on one side before you put it in, but I had cold butter and just covered the bread with very thin slices of butter. Scatter some of the currants on top of the bread and butter, and sprinkle a few spoonfuls of sugar on top. Cover with another layer of bread, butter, currants and sugar. In a separate bowl, beat the eggs with a pint of milk and 2 or 3 more teaspoons of sugar, plus the lemon zest. Pour evenly over the bread, and push the bread down with a spoon to make sure it soaks up the custard. Pour a bit more milk over any dry spots where there isn't enough custard. Heat the oven to 350 degrees. Meanwhile, get a pie plate or deep baking dish, pour 1 inch or so of water into it, and set the dish with the pudding into the water. Bake in the water bath for 20 minutes, then check with a table knife to make sure all the custard is set and it's not soupy in the middle. Cool on a wire rack for a few minutes before serving. The pudding will puff up and brown on top, and then fall as it cools, like a souffle. It will also have a light texture like a souffle.

Many old Victorian recipes use spices and lemon zest, or rose or orange-flower water for flavoring, but not vanilla. The lemon by itself is delicious! I made the same recipe again yesterday, but left the crusts on the bread and added orange-flower water instead of the currants, and I don't like it as well as just the lemon. I may have to try adding a bit of rose water next time. I also have an old recipe for a coconut pound cake that uses rose water as part of the flavoring, and now I also want to use flaked coconut and rose water to flavor bread pudding! It might turn out to be really good!

Saturday, January 9, 2010

Women's Victorian costume: the finishing touches.

_Englishwoman's Domestic Magazine_, ca. 1866.
Of course, accessories really "make" the outfit, in the 21st century as well as the 19th. Many Victorians thought that some kind of coat, shawl or other garment was necessary to lend the proper "finish" to a woman's clothes when outside, even in the warmest of weather! While period photos show us that not every woman wore a jacket, cloak, or coat every minute she was outside, your costume should also include outerwear like a cape or shawl. If you can find a ready-made cape that reaches to your elbows at least, and to the hem of your dress at most, that will work; check thrift stores at Halloween time. Your cape should reach all the way around your body, not just hang down your back, and it should be made of a dark fabric that looks like wool.
A shawl will probably be the easiest to find or make, however; the shawl can be a woven paisley print, or crocheted or knitted, or be a simple square of fabric folded into a triangle large enough to wrap around your shoulders. Neutral colors are best, and try to avoid those really bright crocheted "lace" shawls and ponchos from the 1970s! You can use a small, simple brooch to pin the edges of the shawl together under your chin, so you don't have to hold it on with your arms.

Dark-colored gloves are a also good thing to have. Avoid the polyester or crocheted lace fingerless gloves (or "mitts"), because they were really only worn inside the house, not on the streets during the winter in the 1850s and 1860s. Thrift stores, Wal-Mart and Target carry plain black and brown leather or leather-look gloves that are perfect. You can also use plain black knit gloves, and cut off the fingertips if you want, but be aware that cut-off or ratty gloves are a “lower-class” look! Don’t wear cut-off gloves if you have a modern manicure with nail polish, or very long fingernails, however!

photo ca. 1870. Sense & Sensibility.
You can also make a pair of "muffatees", to keep your hands and wrists warm while keeping your fingers uncovered, by getting a pair of old knitted wool knee socks in black, brown or other solid dark color, and cutting off the feet. Pull the leg portions on your arms so that one end covers your hands up to the first knuckle and the base of your thumb, and the other end covers your wrist and forearm. Use a needle and thread to take a stitch or two in the end that covers your hand, between your thumb and first finger, to make the muffatee fit better, and use Fray-check on the cut edge so it doesn't ravel. Or turn the edge to the inside and sew or glue it down. You wear the muffatees instead of gloves, and they can be worn both inside and ouside, but they are not fashion accessories, they are practical!

Jewelry should be simple and sparse: a plain gold band wedding ring, small gold studs or drop earrings, and a round, oval, or rectangular brooch at your collar are fine, but keep modern wristwatches hidden and leave the rest of your jewelry at home! For carrying those modern things like wallet, keys, water bottle and camera, get a wicker basket with handle to carry over your arm, hide your stuff under a cloth napkin or flour-sack kitchen towel, and you are ready to be seen in the shops!

Kay Gnagey’s 19th Century Costume Research Center
Elizabeth Stewart Clark’s Sewing Academy

Sunday, January 3, 2010

Victorian costuming for women: caps and headresses.

_Graham's Magazine_, 1849. Wikipedia.
A woman old enough to be accepting gentlemen callers was expected to make sure that her hair was arranged attractively at all times, and if she couldn't manage that (like in the middle of the night, at breakfast, or when doing vigorous housework) then she was provided with hundreds of attractive cap styles so she could cover up her hair. Caps were also supposed to help keep the hair cleaner longer, in the same way that clothes absorb oil and sweat and help keep the skin cleaner. Women who were middle-aged or who had children were expected to wear some kind of cap almost everywhere, allowing them to just put their hair up neatly rather than elaborately, and allowing thinning and graying hair to be covered. You might keep this in mind when you wear your costume.

Of course, your hair should be parted in the middle and pinned up as smoothly as possible whether or not you wear a cap. Night caps, like the well-known "mob caps", were not worn outside the bedroom, or perhaps the breakfast room, in the Victorian era. Elderly or conservative ladies often wore caps under their bonnets when outside their own home. Depending on the formality of the occasion, a cap can have white lace, self-fabric ruffles, colored silk flowers, embroidery and ribbons decorating it. Simpler designs for the morning and at home, fancier for the evening or when expecting visitors. Day caps of the period covered the top of the head from ear to ear, and often had ruffles framing the face at the front edge, and ribbon bows over each ear and/or hanging down over the hair at the back. Visit the Cranford web page to see several cap styles for middle-aged and older women.

An easy “cheat” that results in a fairly period Victorian look, is to get a white lace-trimmed hanky, cut or fold it into a triangle, and bobby-pin it on top of your head, with the large point hanging down over the back of your head, and the fold or cut edge going across the top of your head in front of your ears. If you can sew or hot-glue, you can make a very simple cap by getting a piece of fine or semi-sheer white fabric that is at least 3 inches wide and at least 9 inches long, hem it (turn under the fabric edges and sew or glue in place), and glue or sew lengths of lace in overlapping horizontal lines on it, decorating it further with ribbon bows and/or pastel silk flowers over each ear and/or in the center.

Women doing war work in snoods, 1942. Wikipedia.
A popular headdress among modern Victorian costume wearers is called a "snood" and is like a hair net, but it is made out of colored crocheted yarn. The colored yarn snood did not exist during the 1850s and 1860s! It was a product of the 1940s and the practical styles that women wore while doing war work. The Victorian predecessor was called a hair net, or just a "net", and was black or "blonde" (natural unbleached silk), made from knotted silk thread. It was decorated with a line of ribbon bows or rosettes around its edge. For fancier occasions, a net could be made out of narrow velvet ribbon, with velvet ribbon bows and perhaps a tassel hanging off the back. The wearer's hair was pinned up as usual underneath, and the net was pinned in place, running across the top of the head from ear to ear about 2 to 3 inches back of the hairline, behind the ears, and following the hairline at the nape of the neck. The decorative ribbons on the net framed the face.

1855. Bancroft Library Collection.
A good option is to get a regular "lunch lady" hair net, in black or to match your hair, and glue or sew some bows -- coordinating with your dress -- along the edge. If you can't find a regular hair net you can wear a crocheted “snood”, but choose a black one, or match your hair color, rather than a bright color. Instead of decorating your net and bobby-pinning it to your hair, you can thread a satin ribbon through the edge of the net, and tie it in a bow on top of your head when you put it on. Whatever you choose, remember that the hair net is an ornament to the hair, not the thing that keeps your hair out of your face. Your hair should be pinned up inside, filling out the net at the back if you want, or not, and gelled or hair-sprayed so that it won't come loose and wisps of hair won't stick through the mesh. Don’t just pull it on like a shower cap and tuck your loose hair into the back! A net is generally worn without a bonnet, although it can be worn with a hat, especially a riding hat or a toque (pillbox shape with no brim).

Thursday, December 17, 2009

Dickens Fair costuming for women: bonnets and other headgear.

Costumer's Manifesto. Peterson's Magazine, 1850.
A hat or bonnet was necessary outdoor wear for women and girls. Although historically accurate, beautiful, hats and bonnets can be purchased from costume vendors and professional milliners (including those at the Dickens Fair), they are expensive. You can’t make a *great* hat or bonnet without study, training and a lot of work, but you can approximate a *pretty good* one with patience and a bit of handiness!

Look for thrift store and discount store hats that are made of wool felt, in a boater (narrow brim, flat crown), picture hat (wide brim, round crown) or pillbox (flat crown, no brim) shape. Ladies' "church hats" are useful for this. Take off all the modern trim, which will probably be hot-glued on. Feel free to cut your hat to make it the right shape (cover the cut edges with ribbon sewn or hot-glued on top). If the brim of the hat is large enough, you can cut off the back of the brim (behind your head), and fasten long ribbons to each side (tie them under your chin) to make it into more of a bonnet shape. If you know how to use the steam function on your iron, you can steam the felt until it's damp, re-shape it over a bowl or something that's the shape you want, and let it dry to have a better bonnet shape. This can be tricky, though, so make sure you have time to fiddle with it and practice before you need to wear the thing!

You can also cut the entire brim off of your hat, just leaving the crown, as a pillbox style hat. Some stores (like Target) sell pillbox style hats in fake fur that will look good as-is, if you just pin, glue, or sew a feather and ribbon bow on one side or the front. If all you can find is an old straw hat, be sure to hot-glue or sew some fabric over it so that no straw shows. Solid, dark-colored velvet, corduroy, wool, or thick flannel with no printed design will work for this; shape the fabric to the straw hat with pleats, making the pleats look as nice and smooth as you can, and hot-glue, safety pin or sew it in place, fastening the edges to the inside of the hat.
Cathy Decker. 1850.

Decorate your hat with ribbon, silk flowers, feathers, etc. to coordinate with your costume (it doesn’t have to match all the colors exactly), fastening the ornaments on with straight pins, safety pins, hot glue or needle and thread. Bonnets had trim edging the brim, on the sides over each ear, in a line from ear to ear over the top of the bonnet, along the back neck edge, and inside the brim framing the face. Keep your hat or bonnet on your head with a proper hat pin (like a straight pin, but 5 to 10 inches long) stuck through the hat on one side, through your hair inside the hat, and through the other side of the hat, or with small plastic combs sewn into the inside of the hat. Pillbox hats and bonnets should have long ribbon ties securely fastened (sewn or safety-pinned) to the inside, over each ear, to tie under the chin when worn. These ribbons should coordinate with the other trimmings on your hat or bonnet.

Friday, December 11, 2009

Dickens Fair costuming for women: stockings and shoes.

Moniteur de la Mode. 1855.
Sorry for the lag in posting! I lost my Internet access for a week and couldn't finish my research or post anything up! Here is the next section of Dickens Fair costume information: shoes and stockings.

While ideally, your dress will be long enough to cover your feet most of the time, you'll need your skirt to be short enough so that you don't step on it, and that means that your shoes and socks will show somewhat. Stockings should be black or white and can be modern tights or nylons, since they will be almost completely hidden. Knee-highs and regular black trouser socks will work well, too, as long as they're tall enough to cover your legs up to the knees. Do avoid fishnets or tights with colored or sparkly designs on them, because your ankles will be seen as you walk, and designs like that are obviously modern. Your stockings should also be heavy enough that you can’t see your skin through them; modern "sheer" nylons are too see-through!

As for shoes, especially avoid sandals or open shoes, running shoes, anything with chunky platform soles or stiletto heels, cowgirl and Army/work boots! Shoes should be of the lace-up or pull-on granny boot type, in black or brown, with low (1 ½ inches or lower) or flat heels. Sometimes you can find black half-boots in this style that have a discreet zipper up the inside of the ankle; while the zipper was not yet invented in the Victorian era, if the zipper is narrow and not set off by shiny or brightly colored trim, it should be unobtrusive enough. If you can find black adhesive tape (in the automotive section at Wal-Mart, or Orchard Supply or Home Depot) you can use it to cover up any really shiny trim like visible snaps, studs, or sequins. Leather, vinyl, or cloth shoes or boots in this style can often be found at thrift shops and at Wal-Mart and Target, and you can get them a little larger than you need and add an insole inside for comfort. You can also use black Chinese shoes or Mary Janes, or even black Keds, if you have nothing else! They aren’t what a woman of Dickens’ time period would have worn, at all, but they are simple, and black and, with black stockings, they will help your feet “disappear” under your skirts, rather than drawing people’s attention.

If you can’t manage black or brown boots or shoes, then you can buy black knee socks at the thrift store – make sure they’re several sizes too large – cut off the heel and most of the sole (except for about an inch right under the arch of your shoe), and pull them on over your colored shoes to cover them up! They will be like “spats”, except they should cover your whole shoe, or anything that’s not very dark in color. If you like, you can sew or glue a line of black buttons up the outside of the ankle on each one, to give the illusion of wearing buttoned boots. Tuck the top edge of the sock under at about 2 inches above your ankle bone (unless your boot tops are higher) to make them look more like boots, and sew, glue or duct-tape it down on the inside of the sock. You're almost ready to go! Next will be other accessories like bonnets, gloves, and shawls.

The official Dickens Fair costume guide
Dickens Christmas Fair website
Kay Gnagey’s 19th Century Costume Research Center
Elizabeth Stewart Clark’s Sewing Academy

Thursday, December 3, 2009

Dickens Fair costuming for women: Part 4 -- the collar and neckline.

young woman from San Francisco in the 1860s. Sense & Sensibility.
Again, when looking for a blouse to make into a bodice, choose one that has a high jewel neckline, fold-down or Peter Pan type collar or the stand-up mandarin type. These were, by far, the most common necklines on day dress bodices during Dickens' career. If your blouse bodice has a stand-up Mandarin collar, pointed, turn-down collar or rounded, Peter Pan collar, you can leave it as is, and just pin a brooch or ribbon bow at the top button when you wear it.

If you have a white button-down shirt that has a collar, however, you can cut the collar off of the business shirt, cut the collar off of the blouse bodice, and replace it with the white collar from the business shirt. That will give you the look of wearing a white linen collar, which was much more common than wearing colored collars. You have to sew it on, though, as glue and safety pins would not only be very visible so close to your face, but also be uncomfortable. Tuck all raw fabric edges (cut edge of fabric where it frays) to the inside of the neckline and make sure they're fastened down and hidden.

If you can't find a suitable thrift store blouse with a collar, to make into a bodice, then you can use certain collar-less blouse styles. If the blouse bodice has a high jewel neckline with no collar, you can use that same collar from a white thrift-store business shirt, sewing or safety-pinning it inside the neckline so that only the fold-down part of the collar, and not the band that buttons around the neck, is visible. If you like, you can also try a narrow lace collar, especially white crochet or delicate white lace, rather than ecru or other colors, or Battenburg lace; Michael's craft stores sometimes carry them, but also try to find one that is only 1 or 2 inches wide, since that was the fashionable collar size in the mid-Victorian era. The huge sailor collars, or large Battenburg lace collars should be saved for a different project, since they came around -- for adult women's clothing -- much later than the 1860s, and they're one of the things that really shout "modern" when on a Victorian costume!

If the blouse bodice has a turned back (with revers, like a camp shirt), V or squared neckline, it needs what was called a "guimpe" or "habit shirt" underneath. Visible decolletage on the street is not an appropriate look for a "decent" woman! To get this look, you should wear a modern white “dickie” with a Peter Pan style collar underneath, or cut off the upper part of a collared white shirt, including the shoulders, upper chest and collar, and wear it underneath your blouse bodice as a "dicky". Pin it inside the neckline of the blouse (make sure the pins don’t show!) so that it doesn't shift around as you wear it, and make sure all skin is covered. Accessorize with a simple, delicate brooch or grosgrain ribbon bow safety-pinned in place, and you're on your way!

Monday, November 30, 2009

Dickens Fair costuming for women, part 3: altering the sleeves.

Monitor de la Mode, 1855. Costumer's Manifesto.
Sometimes, the sleeves of your thrift store blouse or shirt will need alteration, too, in order to work for a Dickens Fair outfit. This is another area where a too-big shirt or blouse will make a better mid-Victorian bodice: if the shoulder seam hangs below your own shoulders -- between 2 and 5 inches --it will match the lines of the real Victorian bodices! Also, make sure to use a thrift store blouse with long sleeves: gathered sleeves that have a cuff, or looser sleeves without a cuff. Make sure that the sleeves are long enough to reach to your wrist bone, or no more than 2 inches shorter; longer sleeves can be hemmed or cut to the proper length.

If the sleeves have an elastic drawstring at the wrists, you'll need to open the seam, cut the elastic string, and draw it out of the sleeve; if the sleeve is long enough you can even cut off the whole elastic cuff, then fold the cut edge of the fabric to the inside of the sleeve and sew or glue it in place. If the sleeve is at least 3 inches larger than your wrist, this will make an open sleeve style, or a "modified Pagoda" style in the Victorian era. If the sleeves are already loose and open at the wrists, you may not have to alter them at all, other than make them shorter, if they're long enough to hang over your hand. You can also make the sleeves narrower (with safety pins or needle and thread, taking in the sleeve seam from inside the sleeve), following the curve of your elbow and tapering gently to the wrist. Decorate your sleeves around the wrist, at the shoulder seam, and/or along the elbow seam.

Under your open sleeves, you'll need to wear under-sleeves. You can make under-sleeves, easily, by purchasing a white Oxford style long-sleeved business shirt at the thrift store, cutting off the sleeves, and wearing them underneath your blouse bodice sleeves, tying them around your bicep or making a casing for elastic, or even safety-pinning them to the inside of the shoulder seam of your bodice, to keep them in place. The white cuff of the under-sleeve, and part of the lower area of the under-sleeve, should be all that shows when it is worn under your blouse bodice sleeves. If you feel like it, you can sew or glue white lace or ribbon to the cuffs of the under-sleeves, to decorate the part that will show when it is worn.

If the blouse bodice sleeves are gathered and have a buttoned cuff (not elastic or drawstring), you may be able to leave them as they are, just decorating them, if you want. You can also get a white button-down shirt that has French cuffs (double, or folded-over cuffs), cut off the French cuffs and safety-pin, sew or glue them over the cuffs on your blouse bodice sleeves for a different look. Tuck the French cuff's raw edges under and fasten them down so they don't show. Your sleeves will add another wonderful element of style to your costume!

The official Dickens Fair costume guide
Dickens Christmas Fair website
Kay Gnagey’s 19th Century Costume Research Center
Elizabeth Stewart Clark’s Sewing Academy

Monday, November 23, 2009

Dickens Fair costuming for women, part 2: fitting thrift store garments

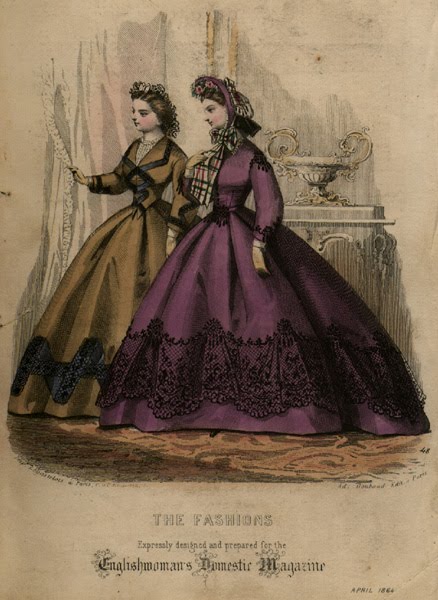
Cathy Decker. Image from April 1864.
Here are some costume alterations tips; your goal for the finished outfit is to achieve the same "look" as if you were making a set of historic reproduction clothing! To alter a blouse for your Dickens fair costume, you should try it on, turned inside out, over your torso support undergarment (corset or Merry Widow) and any undershirt you plan to wear underneath, in order to fit the blouse so that it looks like a Victorian bodice. To make the blouse into a fitted bodice, carefully make the blouse smaller only between the waist and bust in front, between the armpit and waist on the sides, and between the shoulders and waist in back, by pinching the fabric into vertical, symmetrical, pleats or darts, and pinning the darts in place with safety pins. Make the blouse lie as smoothly as possible, and as closely as possible to your figure, without the fabric pulling or straining. It is easier if a friend is there to help you do this (especially the back), but it can be done in front of the bathroom mirror, too.

When the pinning and fitting is done, carefully take off the blouse and, keeping the darts in place, sew the darts down on the inside of the blouse. To fasten them with fabric glue or iron-on adhesive, follow the instructions on the package, positioning the drops of glue or piece of adhesive inside the darts so that it can't be seen from the right side of the bodice (the side that will be seen when the blouse is worn). If you want to avoid sewing or gluing, you can just leave the safety pins holding the darts in place by themselves, making sure they don’t show from the outside. When you wear the blouse, tuck it in to your skirt waistband.

To alter the matching skirt, put it on over the support undergarment, your underskirt and hoop skirt (if you have one) and the fitted blouse bodice. If it is too large, use safety pins to make the waistband close as firmly as you can, or sew on a dress hook and bar. If the waistband is too small, see if you can pin or sew some matching fabric at the waistband opening to cover the gap and allow the skirt to close securely. If the skirt has a pocket or two made of the same fabric, take the pocket apart and use the fabric to fill the gap. If not, safety-pin the skirt opening closed as far up as you can, turn the gap to the back, and make sure to wear a wide belt or sash to cover your waistline when in costume. If the skirt waistline is so much smaller than your own waist, that the gap in the skirt opening can't be covered just by a belt, then you'll need to make or improvise a decorative belt with a bow, hanging ends, or a flounce at the back, big enough to cover any gaps. (Tips for making a decorative belt with flounce will be in a later post!)

Try on the skirt again, over your hoop and petticoats, and make sure that the skirt hem covers them completely, and reaches at least to your ankles. If it drags on the floor, turn the hem to the inside so that it is 2 inches above the floor, and sew or glue it in place. You can even use duct tape to fasten it in place if it will stick to the fabric of your skirt. If the skirt is too short, look for an old sheet or tablecloth in a solid color that matches or coordinates with the rest of your costume (or plain black), and cut a strip from it that is long enough to match the hem of your skirt (plus 2 inches), and 1 or 2 inches wider than you need to reach from the skirt hem (as it came from the thrift store) to a point 2 inches from the floor. You'll need to have someone help you measure when you are wearing your skirt over the petticoat and hoop (if you're wearing one). Put a 1 inch hem in one long side of the tablecloth strip using needle and thread, fabric glue or duct tape, and then sew or glue the other long edge to the bottom edge of your skirt. Also, sew or glue the short edges of the strip together, tucking the raw edges to the inside and making sure that the tablecloth strip lays smoothly and no stitches or raw edges show when you wear the skirt. You can glue or safety-pin a line of braid or other trim on your skirt to cover up the seam between the skirt and the contrasting extension, if you like. You can then use the rest of the fabric in the tablecloth to make trim for your blouse bodice, to tie it in to the design!

Sleeves, collars and accessories will appear in later posts!

The official Dickens Fair costume guide
Dickens Christmas Fair website
Kay Gnagey’s 19th Century Costume Research Center
Elizabeth Stewart Clark’s Sewing Academy

Thursday, November 19, 2009

Dickens Fair costume tips: getting "the look" of the period, for women, part 1

1857 fashion plate from Peterson's Magazine. Costumer's Manifesto.
Although you can purchase Victorian-inspired costumes from various sources, they tend to stand out as "modern" in a venue such as the Dickens Fair (or other living history reenactment), even to the uneducated eye that most of us have. The ultimate goal of wearing period clothing is to foster the illusion that you have just stepped out of a photograph from the period! There are many historic dressmakers who can be hired to make your outfit. Better garments are copied or styled from period fashion illustrations or actual period garments, made in historically appropriate fabrics, and sewn with historically accurate methods and fitting techniques. This kind of dressmaking is highly skilled work -- and it is absolutely worth the price if you have the money for it -- but a less expensive, fairly accurate compromise can be found if you can make your own outfit, and have the time to make it properly.

There are several sewing patterns on the market that will produce appropriate women’s and girls’ dresses from this time period; the majority are specialty patterns available from living history and reenacting community vendors, and on the Internet, and tend to be rather expensive. However, some of the better patterns, and vastly cheaper, are in The Fashion Historian group of patterns (Martha McCain and others) for Simplicity. Look for 99-cent pattern sales at Wal-mart, Jo-Ann's, or other fabric store.

In any case, avoid patterns for garments that look like they belong on Scarlett O’Hara or a dance-hall girl! No off-the-shoulders or cleavage-showing bodices, or bodices that look like they are corsets, "gypsy" skirts, short sleeves, dropped, or high "empire" waistlines. They belong to another time period, or on a Hollywood sound stage, not on the streets of London between 1840 and 1870, which is the setting for the Dickens Fair. Also, avoid the “colored skirt with white lace-trimmed blouse” look, as it was not worn in England during the mid-1800s; your costume should have the look of a one-piece dress, because that is, overwhelmingly, the “look” that the women and girls have in period photos and images.

If you can't sew an entire garment from scratch, you can alter garments that you find in stores like Savers and Goodwill. In thrift stores, look for dark colored, long-sleeved, front-buttoning blouses, and ankle-length, very full skirts, that match or coordinate with each other in color and pattern, that fit loosely or are at least one size too large for you. You will need to alter these garments to make them small enough to fit your torso more closely, but your measurements will be different when you are wearing your costume, so it is best to get something too big than something that "just fits". You can always make it smaller, but you can't always make it bigger ... Fitting tips will be in the next post!

Originals By Kay -- seller of fabric and some ready-to wear historic costume
Kay Gnagey's 19th Century Clothing Research Corner

Saturday, July 18, 2009

Victorian cosmetics: uses for rose water.

homemade rose water.
I was able to make about a cup of rose water earlier this week, and I plan to make some more once I get more suitable rose petals! Rose water has been touted for many cosmetic uses, from the Renaissance era to today. It is useful as a perfume, but also as a skin toner or mild astringent, and a hair rinse. Here are some Victorian recipes that use rose water in combination with other ingredients, for cosmetic preparations:

From Inquire Within for Anything You Want To Know, 1858:

TO REMOVE FRECKLES.—Dissolve, in half an ounce of lemon-juice, one ounce of Venice soap, and add a quarter of an ounce each of oil of bitter almonds, and deliquated [sic] oil of tartar. Place this mixture in the sun till it acquires the consistency of ointment. When in this state add three drops of the oil of rhodium, and keep it for use. Apply it to the face and hands in the manner following: wash the parts at night with elder-flower water, then anoint with the ointment. In the morning cleanse the skin from its oily adhesion by washing it copiously in rose-water.

From Godey's Lady's Book, 1860:

An excellent soap may be made by scraping and melting down some white curd soap, and adding to it some almond paste. The almonds should first be bleached, and then beaten into a smooth paste, with a small portion of white of egg, and as much rose-water and half its quantity of spirits of wine as will give the paste a proper consistency. Mix this with the melted soap in a proportion of one-fourth.

Wednesday, May 6, 2009

A spring menu from 1860.

image from ClipartEtc.com
I always find it interesting to read domestic magazines and see the editors' recommendations for things like menus and home decorating. Here is one of the suggested menus from the April 1860 issue of Godey's Lady's Book:

"Green pea soup, chicken pie, broiled ham, peas, asparagus, beans; biscuit pudding, gooseberry fool."

It looks like the pea soup, chicken pie, broiled ham and vegetables are pretty straightforward; most recipes that I've seen seem to call for boiling or stewing the vegetables, and serving them with butter and salt, the pea soup can be made with fresh peas or regular dried split peas, the chicken pie can be a chicken pot pie, etc., and according to Godey's Lady's Book, broiling in 1860 is what we'd call "char-broiling" or "grilling" these days. Here's the definition, and cooking instructions: "Broiling differs from frying in that there is no addition of oil or fat, and that the effect is produced by the direct radiation of heat from a clear fire, the broiling article being supported over it by a gridiron. ... In broiling, after heating and larding the gridiron, put on the steak, chop, or other article, and continually turn it every half minute, moving it gently all the time, to avoid the marks left by the bars if suffered to remain still."

As for the desserts:

"Gooseberry Fool.
Two quarts of gooseberries; one quart of water; sugar to taste; two quarts of new milk; yolks of four eggs; a little grated nutmeg.

Put two quarts of gooseberries into a stewpan with a quart of water; when they begin to turn yellow and swell, drain the water from them and press them with the back of a spoon through a colander, sweeten them to your taste, and set them to cool. Put two quarts of milk over the fire beaten up with the yolks of four eggs, and a little grated nutmeg; stir it over the fire until it begins to simmer, then take it off, and stir it gradually into the cold gooseberries, let it stand until cold, and serve it. The eggs may be left out and milk only be used. Half this quantity makes a good dishful."
--from Warne’s Model Cookery, ca. 1891.

and

"Biscuit Pudding, Without Re-baking.—
Take water 1 qt; sugar ¼ lb.; butter the size of a hen’s egg; flour 4 table-spoons; nutmeg, grated 1/2 of one. [plus some leftover biscuits]

Mix the flour with just sufficient cold water to rub up all the lumps while the balance of the water is heating, mix all, and split the biscuit once or twice, and put into this gravy while it is hot, and keep hot until used at table. It uses up cold biscuit, and I prefer it to richer puddings. It is indeed worth a trial. This makes a nice dip gravy also for other puddings."
-- from Dr. Chase’s Recipes or Information for Everybody, by A.W. Chase, M.D., Ann Arbor, Michigan, 38th edition, 1866; reprinted 1970.

Tuesday, March 31, 2009

French Toast: a dish for breakfast or tea!

image from AntiqueClipArt.com
Although I always think of French Toast as a breakfast item, apparently it is more versatile. I love to look through old cookbooks and women's magazines, because they have so many "new" ideas that deserve to be re-visited again! I am really starting to research recipes that are meant to use up leftovers or things that might otherwise be wasted, like the heels of bread. French toast has been around for a longer time than I thought; it seems to be Victorian! Imagine French Toast on the 19th century tea table: this recipe for French Toast is from Peterson's Magazine, from the year 1867.

French Toast.

Beat four eggs very light, and stir with them a pint of milk; slice some baker's bread, dip the pieces into the egg, then lay them in a pan of hot lard, and fry brown; sprinkle a little powdered-sugar and cinnamon on each piece, and serve hot. If nicely prepared, this is an excellent dish for breakfast or tea.
Now stir the fire, and close the shutters fast,
Let fall the curtains, wheel the sofa round,
And, while the bubbling and loud-hissing urn
Throws up a steamy column, and the cups
That cheer but not inebriate, wait on each,
So let us welcome peaceful evening in.
-- William Cowper (1731-1800)
"The Winter Evening" (Book Four), _The Task_ (1784)