The Ladies' Tea Guild
Showing posts with label Dickens. Show all posts

Sunday, November 4, 2012

Chit-chat of November fashions from 1850

_Peterson's Magazine_, 1850.

CHIT-CHAT OF NOVEMBER FASHIONS. (Godey's Lady's Book, November 1850)

To commence with out-door dress, it will be noticed that the favorite materials for walking costumes are merino, cashmeres, and silks. The first are exquisitely fine and soft, falling to the figure ... Plain colors are most in favor, and, most of all, a new rich hue of dark brown; this is the most distingue of the multitude of shades that pile the counters of our merchants. Among them are every variety of greens, blues, crimson, corn color, purples, browns, and scarlets. The same hues are in cashmere, with the advantage of being lighter and a trifle less costly. There are several styles of trimming for these heavy materials; one very simple, alternate rows of wide and very narrow plain silk braid, or galloon. A more expensive mode is velvet of the same color as the dress, embroidered with narrow braid, which has a richer effect than embossing, and, being so heavy, is suitable for an out-door costume. Alternate folds of cashmere and satin are also very pretty, but not decidedly new. Worsted lace is also much used, and a quilling of plain or velvet ribbon is always elegant.

Sunday, December 5, 2010

Making a late-Victorian day cap, ca. 1882

Day caps.  Frank Leslie's Lady's Magazine, 1863.
Now that the winter is closing in, we costumers start thinking about sewing projects that we want to complete for the holiday season.  There are so many fun events happening all over the United States that it can be hard to choose which ones to attend!  Here in the Bay Area we have the Great Dickens Christmas Fair going on, and California costumers love to go there in Victorian costume.  The best costumes are complete outfits, including all the little details of accessories, like day caps, that make you look like you've stepped out of the past.

Saturday, January 9, 2010

Women's Victorian costume: the finishing touches.

_Englishwoman's Domestic Magazine_, ca. 1866.
Of course, accessories really "make" the outfit, in the 21st century as well as the 19th. Many Victorians thought that some kind of coat, shawl or other garment was necessary to lend the proper "finish" to a woman's clothes when outside, even in the warmest of weather! While period photos show us that not every woman wore a jacket, cloak, or coat every minute she was outside, your costume should also include outerwear like a cape or shawl. If you can find a ready-made cape that reaches to your elbows at least, and to the hem of your dress at most, that will work; check thrift stores at Halloween time. Your cape should reach all the way around your body, not just hang down your back, and it should be made of a dark fabric that looks like wool.
A shawl will probably be the easiest to find or make, however; the shawl can be a woven paisley print, or crocheted or knitted, or be a simple square of fabric folded into a triangle large enough to wrap around your shoulders. Neutral colors are best, and try to avoid those really bright crocheted "lace" shawls and ponchos from the 1970s! You can use a small, simple brooch to pin the edges of the shawl together under your chin, so you don't have to hold it on with your arms.

Dark-colored gloves are a also good thing to have. Avoid the polyester or crocheted lace fingerless gloves (or "mitts"), because they were really only worn inside the house, not on the streets during the winter in the 1850s and 1860s. Thrift stores, Wal-Mart and Target carry plain black and brown leather or leather-look gloves that are perfect. You can also use plain black knit gloves, and cut off the fingertips if you want, but be aware that cut-off or ratty gloves are a “lower-class” look! Don’t wear cut-off gloves if you have a modern manicure with nail polish, or very long fingernails, however!

photo ca. 1870. Sense & Sensibility.
You can also make a pair of "muffatees", to keep your hands and wrists warm while keeping your fingers uncovered, by getting a pair of old knitted wool knee socks in black, brown or other solid dark color, and cutting off the feet. Pull the leg portions on your arms so that one end covers your hands up to the first knuckle and the base of your thumb, and the other end covers your wrist and forearm. Use a needle and thread to take a stitch or two in the end that covers your hand, between your thumb and first finger, to make the muffatee fit better, and use Fray-check on the cut edge so it doesn't ravel. Or turn the edge to the inside and sew or glue it down. You wear the muffatees instead of gloves, and they can be worn both inside and ouside, but they are not fashion accessories, they are practical!

Jewelry should be simple and sparse: a plain gold band wedding ring, small gold studs or drop earrings, and a round, oval, or rectangular brooch at your collar are fine, but keep modern wristwatches hidden and leave the rest of your jewelry at home! For carrying those modern things like wallet, keys, water bottle and camera, get a wicker basket with handle to carry over your arm, hide your stuff under a cloth napkin or flour-sack kitchen towel, and you are ready to be seen in the shops!

Kay Gnagey’s 19th Century Costume Research Center
Elizabeth Stewart Clark’s Sewing Academy

Sunday, January 3, 2010

Victorian costuming for women: caps and headresses.

_Graham's Magazine_, 1849. Wikipedia.
A woman old enough to be accepting gentlemen callers was expected to make sure that her hair was arranged attractively at all times, and if she couldn't manage that (like in the middle of the night, at breakfast, or when doing vigorous housework) then she was provided with hundreds of attractive cap styles so she could cover up her hair. Caps were also supposed to help keep the hair cleaner longer, in the same way that clothes absorb oil and sweat and help keep the skin cleaner. Women who were middle-aged or who had children were expected to wear some kind of cap almost everywhere, allowing them to just put their hair up neatly rather than elaborately, and allowing thinning and graying hair to be covered. You might keep this in mind when you wear your costume.

Of course, your hair should be parted in the middle and pinned up as smoothly as possible whether or not you wear a cap. Night caps, like the well-known "mob caps", were not worn outside the bedroom, or perhaps the breakfast room, in the Victorian era. Elderly or conservative ladies often wore caps under their bonnets when outside their own home. Depending on the formality of the occasion, a cap can have white lace, self-fabric ruffles, colored silk flowers, embroidery and ribbons decorating it. Simpler designs for the morning and at home, fancier for the evening or when expecting visitors. Day caps of the period covered the top of the head from ear to ear, and often had ruffles framing the face at the front edge, and ribbon bows over each ear and/or hanging down over the hair at the back. Visit the Cranford web page to see several cap styles for middle-aged and older women.

An easy “cheat” that results in a fairly period Victorian look, is to get a white lace-trimmed hanky, cut or fold it into a triangle, and bobby-pin it on top of your head, with the large point hanging down over the back of your head, and the fold or cut edge going across the top of your head in front of your ears. If you can sew or hot-glue, you can make a very simple cap by getting a piece of fine or semi-sheer white fabric that is at least 3 inches wide and at least 9 inches long, hem it (turn under the fabric edges and sew or glue in place), and glue or sew lengths of lace in overlapping horizontal lines on it, decorating it further with ribbon bows and/or pastel silk flowers over each ear and/or in the center.

Women doing war work in snoods, 1942. Wikipedia.
A popular headdress among modern Victorian costume wearers is called a "snood" and is like a hair net, but it is made out of colored crocheted yarn. The colored yarn snood did not exist during the 1850s and 1860s! It was a product of the 1940s and the practical styles that women wore while doing war work. The Victorian predecessor was called a hair net, or just a "net", and was black or "blonde" (natural unbleached silk), made from knotted silk thread. It was decorated with a line of ribbon bows or rosettes around its edge. For fancier occasions, a net could be made out of narrow velvet ribbon, with velvet ribbon bows and perhaps a tassel hanging off the back. The wearer's hair was pinned up as usual underneath, and the net was pinned in place, running across the top of the head from ear to ear about 2 to 3 inches back of the hairline, behind the ears, and following the hairline at the nape of the neck. The decorative ribbons on the net framed the face.

1855. Bancroft Library Collection.
A good option is to get a regular "lunch lady" hair net, in black or to match your hair, and glue or sew some bows -- coordinating with your dress -- along the edge. If you can't find a regular hair net you can wear a crocheted “snood”, but choose a black one, or match your hair color, rather than a bright color. Instead of decorating your net and bobby-pinning it to your hair, you can thread a satin ribbon through the edge of the net, and tie it in a bow on top of your head when you put it on. Whatever you choose, remember that the hair net is an ornament to the hair, not the thing that keeps your hair out of your face. Your hair should be pinned up inside, filling out the net at the back if you want, or not, and gelled or hair-sprayed so that it won't come loose and wisps of hair won't stick through the mesh. Don’t just pull it on like a shower cap and tuck your loose hair into the back! A net is generally worn without a bonnet, although it can be worn with a hat, especially a riding hat or a toque (pillbox shape with no brim).

Thursday, December 31, 2009

Victorian costuming for women: hair arranging.

Victoria Fashion magazine. 1869 fashion plate. Wikipedia.
Even though the Great Dickens Christmas Fair has ended for the year, there are many 19th century-themed events scheduled for 2010 in various parts of North America, and appropriate Victorian costume is a good addition to the ambiance. One detail that can really distract from an otherwise good Victorian appearance is a modern hairstyle. Hair that was loose, "piecey", wispy, or with "body" was not the stylish ideal for women! Women's hair was supposed to be glossy, smooth, controlled, off the face, and elegant, and anything else was considered sloppy, un-groomed, and unbecoming.

When you wear a Victorian costume, your hair should not be in an obviously modern style. At the very least, your hair should be parted in the middle, smoothed down (use mousse or gel for this), pulled back and pinned at the back of your head. If you have bangs, even they should be parted and slicked back, and they can be twisted together and pinned back to hold them in place. Although it is the current style for grown women to wear their hair down, for Victorian outfits, avoid wearing your hair loose if you are older than 12 years old! Even actresses and prostitutes wouldn't have worn their hair down in the streets unless they were "advertising" ...
Wikipedia image, 1840s.
Long hair can be braided or coiled into a bun and pinned up above the nape of your neck. If your hair isn't too long, or if it is shorter around your face, you can pin or slick back most of your hair, and curl your front hair (over your temples, in front of your ears) into ringlets that hang in front of your ears. These were called "sausage curls" in the period, because they appeared as round and solid as sausages! They should be very smooth, thick and glossy, they should not hang much lower than your jawline, and they should not hang over your forehead like bangs. Use lots of mousse, gel and hairspray to keep everything smooth! They should peek out from the brim of any bonnet or cap that you wear.

Portrait ca. 1865. Wikipedia.
If your hair is too short to put in a ponytail, you should part it, gel it, comb and bobby-pin it to slick it behind your ears, try to make it as smooth as possible, and keep the back part covered with your bonnet. Conversely, you can curl all of your hair into smooth ringlets, all over your head, and let your front curls peek out from your bonnet brim. You can also get a natural-looking wig or hair-piece and style it in a Victorian style if your hair won't do what you want.

If your hair is dyed an obviously non-natural color, and you don't want to use a wig or re-dye your hair, your best bet is to cover it completely. Even though it was about 50 years out of date by the 1850s, the white “mob” cap style is good for this. Curl the hair along your hairline into pin curl ringlets so that they won't be so modern-looking if they peek out from the edges of your cap. Even if your hair is a natural color, and even if you have long hair, if you are over about 40 years old, you should also consider a cap. Cap information will be posted next!

Thursday, December 17, 2009

Dickens Fair costuming for women: bonnets and other headgear.

Costumer's Manifesto. Peterson's Magazine, 1850.
A hat or bonnet was necessary outdoor wear for women and girls. Although historically accurate, beautiful, hats and bonnets can be purchased from costume vendors and professional milliners (including those at the Dickens Fair), they are expensive. You can’t make a *great* hat or bonnet without study, training and a lot of work, but you can approximate a *pretty good* one with patience and a bit of handiness!

Look for thrift store and discount store hats that are made of wool felt, in a boater (narrow brim, flat crown), picture hat (wide brim, round crown) or pillbox (flat crown, no brim) shape. Ladies' "church hats" are useful for this. Take off all the modern trim, which will probably be hot-glued on. Feel free to cut your hat to make it the right shape (cover the cut edges with ribbon sewn or hot-glued on top). If the brim of the hat is large enough, you can cut off the back of the brim (behind your head), and fasten long ribbons to each side (tie them under your chin) to make it into more of a bonnet shape. If you know how to use the steam function on your iron, you can steam the felt until it's damp, re-shape it over a bowl or something that's the shape you want, and let it dry to have a better bonnet shape. This can be tricky, though, so make sure you have time to fiddle with it and practice before you need to wear the thing!

You can also cut the entire brim off of your hat, just leaving the crown, as a pillbox style hat. Some stores (like Target) sell pillbox style hats in fake fur that will look good as-is, if you just pin, glue, or sew a feather and ribbon bow on one side or the front. If all you can find is an old straw hat, be sure to hot-glue or sew some fabric over it so that no straw shows. Solid, dark-colored velvet, corduroy, wool, or thick flannel with no printed design will work for this; shape the fabric to the straw hat with pleats, making the pleats look as nice and smooth as you can, and hot-glue, safety pin or sew it in place, fastening the edges to the inside of the hat.
Cathy Decker. 1850.

Decorate your hat with ribbon, silk flowers, feathers, etc. to coordinate with your costume (it doesn’t have to match all the colors exactly), fastening the ornaments on with straight pins, safety pins, hot glue or needle and thread. Bonnets had trim edging the brim, on the sides over each ear, in a line from ear to ear over the top of the bonnet, along the back neck edge, and inside the brim framing the face. Keep your hat or bonnet on your head with a proper hat pin (like a straight pin, but 5 to 10 inches long) stuck through the hat on one side, through your hair inside the hat, and through the other side of the hat, or with small plastic combs sewn into the inside of the hat. Pillbox hats and bonnets should have long ribbon ties securely fastened (sewn or safety-pinned) to the inside, over each ear, to tie under the chin when worn. These ribbons should coordinate with the other trimmings on your hat or bonnet.

Friday, December 11, 2009

Dickens Fair costuming for women: stockings and shoes.

Moniteur de la Mode. 1855.
Sorry for the lag in posting! I lost my Internet access for a week and couldn't finish my research or post anything up! Here is the next section of Dickens Fair costume information: shoes and stockings.

While ideally, your dress will be long enough to cover your feet most of the time, you'll need your skirt to be short enough so that you don't step on it, and that means that your shoes and socks will show somewhat. Stockings should be black or white and can be modern tights or nylons, since they will be almost completely hidden. Knee-highs and regular black trouser socks will work well, too, as long as they're tall enough to cover your legs up to the knees. Do avoid fishnets or tights with colored or sparkly designs on them, because your ankles will be seen as you walk, and designs like that are obviously modern. Your stockings should also be heavy enough that you can’t see your skin through them; modern "sheer" nylons are too see-through!

As for shoes, especially avoid sandals or open shoes, running shoes, anything with chunky platform soles or stiletto heels, cowgirl and Army/work boots! Shoes should be of the lace-up or pull-on granny boot type, in black or brown, with low (1 ½ inches or lower) or flat heels. Sometimes you can find black half-boots in this style that have a discreet zipper up the inside of the ankle; while the zipper was not yet invented in the Victorian era, if the zipper is narrow and not set off by shiny or brightly colored trim, it should be unobtrusive enough. If you can find black adhesive tape (in the automotive section at Wal-Mart, or Orchard Supply or Home Depot) you can use it to cover up any really shiny trim like visible snaps, studs, or sequins. Leather, vinyl, or cloth shoes or boots in this style can often be found at thrift shops and at Wal-Mart and Target, and you can get them a little larger than you need and add an insole inside for comfort. You can also use black Chinese shoes or Mary Janes, or even black Keds, if you have nothing else! They aren’t what a woman of Dickens’ time period would have worn, at all, but they are simple, and black and, with black stockings, they will help your feet “disappear” under your skirts, rather than drawing people’s attention.

If you can’t manage black or brown boots or shoes, then you can buy black knee socks at the thrift store – make sure they’re several sizes too large – cut off the heel and most of the sole (except for about an inch right under the arch of your shoe), and pull them on over your colored shoes to cover them up! They will be like “spats”, except they should cover your whole shoe, or anything that’s not very dark in color. If you like, you can sew or glue a line of black buttons up the outside of the ankle on each one, to give the illusion of wearing buttoned boots. Tuck the top edge of the sock under at about 2 inches above your ankle bone (unless your boot tops are higher) to make them look more like boots, and sew, glue or duct-tape it down on the inside of the sock. You're almost ready to go! Next will be other accessories like bonnets, gloves, and shawls.

The official Dickens Fair costume guide
Dickens Christmas Fair website
Kay Gnagey’s 19th Century Costume Research Center
Elizabeth Stewart Clark’s Sewing Academy

Thursday, December 3, 2009

Dickens Fair costuming for women: Part 4 -- the collar and neckline.

young woman from San Francisco in the 1860s. Sense & Sensibility.
Again, when looking for a blouse to make into a bodice, choose one that has a high jewel neckline, fold-down or Peter Pan type collar or the stand-up mandarin type. These were, by far, the most common necklines on day dress bodices during Dickens' career. If your blouse bodice has a stand-up Mandarin collar, pointed, turn-down collar or rounded, Peter Pan collar, you can leave it as is, and just pin a brooch or ribbon bow at the top button when you wear it.

If you have a white button-down shirt that has a collar, however, you can cut the collar off of the business shirt, cut the collar off of the blouse bodice, and replace it with the white collar from the business shirt. That will give you the look of wearing a white linen collar, which was much more common than wearing colored collars. You have to sew it on, though, as glue and safety pins would not only be very visible so close to your face, but also be uncomfortable. Tuck all raw fabric edges (cut edge of fabric where it frays) to the inside of the neckline and make sure they're fastened down and hidden.

If you can't find a suitable thrift store blouse with a collar, to make into a bodice, then you can use certain collar-less blouse styles. If the blouse bodice has a high jewel neckline with no collar, you can use that same collar from a white thrift-store business shirt, sewing or safety-pinning it inside the neckline so that only the fold-down part of the collar, and not the band that buttons around the neck, is visible. If you like, you can also try a narrow lace collar, especially white crochet or delicate white lace, rather than ecru or other colors, or Battenburg lace; Michael's craft stores sometimes carry them, but also try to find one that is only 1 or 2 inches wide, since that was the fashionable collar size in the mid-Victorian era. The huge sailor collars, or large Battenburg lace collars should be saved for a different project, since they came around -- for adult women's clothing -- much later than the 1860s, and they're one of the things that really shout "modern" when on a Victorian costume!

If the blouse bodice has a turned back (with revers, like a camp shirt), V or squared neckline, it needs what was called a "guimpe" or "habit shirt" underneath. Visible decolletage on the street is not an appropriate look for a "decent" woman! To get this look, you should wear a modern white “dickie” with a Peter Pan style collar underneath, or cut off the upper part of a collared white shirt, including the shoulders, upper chest and collar, and wear it underneath your blouse bodice as a "dicky". Pin it inside the neckline of the blouse (make sure the pins don’t show!) so that it doesn't shift around as you wear it, and make sure all skin is covered. Accessorize with a simple, delicate brooch or grosgrain ribbon bow safety-pinned in place, and you're on your way!

Monday, November 30, 2009

Dickens Fair costuming for women, part 3: altering the sleeves.

Monitor de la Mode, 1855. Costumer's Manifesto.
Sometimes, the sleeves of your thrift store blouse or shirt will need alteration, too, in order to work for a Dickens Fair outfit. This is another area where a too-big shirt or blouse will make a better mid-Victorian bodice: if the shoulder seam hangs below your own shoulders -- between 2 and 5 inches --it will match the lines of the real Victorian bodices! Also, make sure to use a thrift store blouse with long sleeves: gathered sleeves that have a cuff, or looser sleeves without a cuff. Make sure that the sleeves are long enough to reach to your wrist bone, or no more than 2 inches shorter; longer sleeves can be hemmed or cut to the proper length.

If the sleeves have an elastic drawstring at the wrists, you'll need to open the seam, cut the elastic string, and draw it out of the sleeve; if the sleeve is long enough you can even cut off the whole elastic cuff, then fold the cut edge of the fabric to the inside of the sleeve and sew or glue it in place. If the sleeve is at least 3 inches larger than your wrist, this will make an open sleeve style, or a "modified Pagoda" style in the Victorian era. If the sleeves are already loose and open at the wrists, you may not have to alter them at all, other than make them shorter, if they're long enough to hang over your hand. You can also make the sleeves narrower (with safety pins or needle and thread, taking in the sleeve seam from inside the sleeve), following the curve of your elbow and tapering gently to the wrist. Decorate your sleeves around the wrist, at the shoulder seam, and/or along the elbow seam.

Under your open sleeves, you'll need to wear under-sleeves. You can make under-sleeves, easily, by purchasing a white Oxford style long-sleeved business shirt at the thrift store, cutting off the sleeves, and wearing them underneath your blouse bodice sleeves, tying them around your bicep or making a casing for elastic, or even safety-pinning them to the inside of the shoulder seam of your bodice, to keep them in place. The white cuff of the under-sleeve, and part of the lower area of the under-sleeve, should be all that shows when it is worn under your blouse bodice sleeves. If you feel like it, you can sew or glue white lace or ribbon to the cuffs of the under-sleeves, to decorate the part that will show when it is worn.

If the blouse bodice sleeves are gathered and have a buttoned cuff (not elastic or drawstring), you may be able to leave them as they are, just decorating them, if you want. You can also get a white button-down shirt that has French cuffs (double, or folded-over cuffs), cut off the French cuffs and safety-pin, sew or glue them over the cuffs on your blouse bodice sleeves for a different look. Tuck the French cuff's raw edges under and fasten them down so they don't show. Your sleeves will add another wonderful element of style to your costume!

The official Dickens Fair costume guide
Dickens Christmas Fair website
Kay Gnagey’s 19th Century Costume Research Center
Elizabeth Stewart Clark’s Sewing Academy

Monday, November 23, 2009

Dickens Fair costuming for women, part 2: fitting thrift store garments

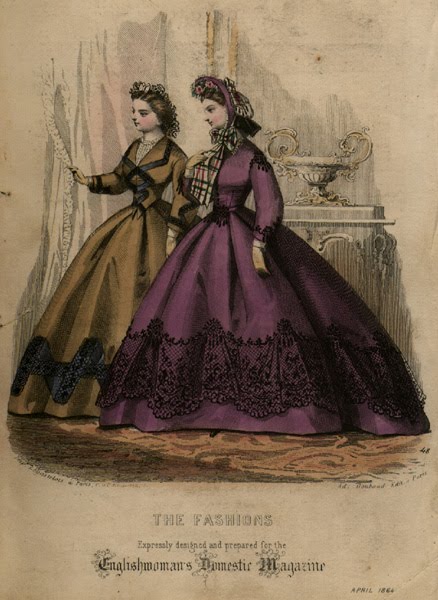
Cathy Decker. Image from April 1864.
Here are some costume alterations tips; your goal for the finished outfit is to achieve the same "look" as if you were making a set of historic reproduction clothing! To alter a blouse for your Dickens fair costume, you should try it on, turned inside out, over your torso support undergarment (corset or Merry Widow) and any undershirt you plan to wear underneath, in order to fit the blouse so that it looks like a Victorian bodice. To make the blouse into a fitted bodice, carefully make the blouse smaller only between the waist and bust in front, between the armpit and waist on the sides, and between the shoulders and waist in back, by pinching the fabric into vertical, symmetrical, pleats or darts, and pinning the darts in place with safety pins. Make the blouse lie as smoothly as possible, and as closely as possible to your figure, without the fabric pulling or straining. It is easier if a friend is there to help you do this (especially the back), but it can be done in front of the bathroom mirror, too.

When the pinning and fitting is done, carefully take off the blouse and, keeping the darts in place, sew the darts down on the inside of the blouse. To fasten them with fabric glue or iron-on adhesive, follow the instructions on the package, positioning the drops of glue or piece of adhesive inside the darts so that it can't be seen from the right side of the bodice (the side that will be seen when the blouse is worn). If you want to avoid sewing or gluing, you can just leave the safety pins holding the darts in place by themselves, making sure they don’t show from the outside. When you wear the blouse, tuck it in to your skirt waistband.

To alter the matching skirt, put it on over the support undergarment, your underskirt and hoop skirt (if you have one) and the fitted blouse bodice. If it is too large, use safety pins to make the waistband close as firmly as you can, or sew on a dress hook and bar. If the waistband is too small, see if you can pin or sew some matching fabric at the waistband opening to cover the gap and allow the skirt to close securely. If the skirt has a pocket or two made of the same fabric, take the pocket apart and use the fabric to fill the gap. If not, safety-pin the skirt opening closed as far up as you can, turn the gap to the back, and make sure to wear a wide belt or sash to cover your waistline when in costume. If the skirt waistline is so much smaller than your own waist, that the gap in the skirt opening can't be covered just by a belt, then you'll need to make or improvise a decorative belt with a bow, hanging ends, or a flounce at the back, big enough to cover any gaps. (Tips for making a decorative belt with flounce will be in a later post!)

Try on the skirt again, over your hoop and petticoats, and make sure that the skirt hem covers them completely, and reaches at least to your ankles. If it drags on the floor, turn the hem to the inside so that it is 2 inches above the floor, and sew or glue it in place. You can even use duct tape to fasten it in place if it will stick to the fabric of your skirt. If the skirt is too short, look for an old sheet or tablecloth in a solid color that matches or coordinates with the rest of your costume (or plain black), and cut a strip from it that is long enough to match the hem of your skirt (plus 2 inches), and 1 or 2 inches wider than you need to reach from the skirt hem (as it came from the thrift store) to a point 2 inches from the floor. You'll need to have someone help you measure when you are wearing your skirt over the petticoat and hoop (if you're wearing one). Put a 1 inch hem in one long side of the tablecloth strip using needle and thread, fabric glue or duct tape, and then sew or glue the other long edge to the bottom edge of your skirt. Also, sew or glue the short edges of the strip together, tucking the raw edges to the inside and making sure that the tablecloth strip lays smoothly and no stitches or raw edges show when you wear the skirt. You can glue or safety-pin a line of braid or other trim on your skirt to cover up the seam between the skirt and the contrasting extension, if you like. You can then use the rest of the fabric in the tablecloth to make trim for your blouse bodice, to tie it in to the design!

Sleeves, collars and accessories will appear in later posts!

The official Dickens Fair costume guide
Dickens Christmas Fair website
Kay Gnagey’s 19th Century Costume Research Center
Elizabeth Stewart Clark’s Sewing Academy

Thursday, November 19, 2009

Dickens Fair costume tips: getting "the look" of the period, for women, part 1

1857 fashion plate from Peterson's Magazine. Costumer's Manifesto.
Although you can purchase Victorian-inspired costumes from various sources, they tend to stand out as "modern" in a venue such as the Dickens Fair (or other living history reenactment), even to the uneducated eye that most of us have. The ultimate goal of wearing period clothing is to foster the illusion that you have just stepped out of a photograph from the period! There are many historic dressmakers who can be hired to make your outfit. Better garments are copied or styled from period fashion illustrations or actual period garments, made in historically appropriate fabrics, and sewn with historically accurate methods and fitting techniques. This kind of dressmaking is highly skilled work -- and it is absolutely worth the price if you have the money for it -- but a less expensive, fairly accurate compromise can be found if you can make your own outfit, and have the time to make it properly.

There are several sewing patterns on the market that will produce appropriate women’s and girls’ dresses from this time period; the majority are specialty patterns available from living history and reenacting community vendors, and on the Internet, and tend to be rather expensive. However, some of the better patterns, and vastly cheaper, are in The Fashion Historian group of patterns (Martha McCain and others) for Simplicity. Look for 99-cent pattern sales at Wal-mart, Jo-Ann's, or other fabric store.

In any case, avoid patterns for garments that look like they belong on Scarlett O’Hara or a dance-hall girl! No off-the-shoulders or cleavage-showing bodices, or bodices that look like they are corsets, "gypsy" skirts, short sleeves, dropped, or high "empire" waistlines. They belong to another time period, or on a Hollywood sound stage, not on the streets of London between 1840 and 1870, which is the setting for the Dickens Fair. Also, avoid the “colored skirt with white lace-trimmed blouse” look, as it was not worn in England during the mid-1800s; your costume should have the look of a one-piece dress, because that is, overwhelmingly, the “look” that the women and girls have in period photos and images.

If you can't sew an entire garment from scratch, you can alter garments that you find in stores like Savers and Goodwill. In thrift stores, look for dark colored, long-sleeved, front-buttoning blouses, and ankle-length, very full skirts, that match or coordinate with each other in color and pattern, that fit loosely or are at least one size too large for you. You will need to alter these garments to make them small enough to fit your torso more closely, but your measurements will be different when you are wearing your costume, so it is best to get something too big than something that "just fits". You can always make it smaller, but you can't always make it bigger ... Fitting tips will be in the next post!

Originals By Kay -- seller of fabric and some ready-to wear historic costume
Kay Gnagey's 19th Century Clothing Research Corner

Tuesday, November 17, 2009

Dickens Fair costume tips: Essential Undergarments!

Costumer's Manifesto. 1860 Crinoline, by Karl Kohler.
For men:
Male clothing of the period aimed to make the wearer look respectable, sober, well-groomed, and genteel. The clothes were supposed to fit the figure well, with none of the sloppiness or bagginess that is currently fashionable. Shirts had extra-long tails in front and back, which were always tucked into the trouser waistband and could be wrapped under the body between the legs to provide cleanliness and protection from chafing if no other undergarment was worn. Shirts were made of white linen and were considered part of the undergarments, which is why almost all of the shirt was kept covered by the coat, trousers, waistcoat, and cravat when in public!

Year-round, stockings were wool, cotton or silk (for the wealthy), what we would call "dress socks" these days, long enough to almost reach to the knee, held up with garters. In colder weather (and for the wealthier men), linen drawers could be worn under the shirt; they were about knee-length, and slightly fitted to the leg to minimize bunching under the trousers. For cold weather, knitted wool or flannel "Union Suits" were available, but none of these undergarments really changed the way the man's body looked in his clothes. That was left for the women!

It is fairly easy to approximate Victorian male underclothes for costume purposes. Modern "long johns" or boxers, and a short-sleeved white T-shirt are all you need. I recommend not wearing a tank top or sleeveless undershirt, though, because the neckline and armhole edges tend to show through your shirt if you take your waistcoat and coat off.

For women:
Female clothing of the mid-1800s created a distinctive silhouette, which depended on certain essential undergarments: the corset and petticoats. Women wore ankle to floor-length dresses with full skirts; for everyday wear, the dress bodices had high "jewel" necklines and long sleeves, and were fitted to make the torso appear smooth. A corset was necessary, and respectable middle and lower class women wore them to support and smooth the bust, torso and back. Tight-lacing, like Scarlett O’Hara did to get her 18 inch waist, was impractical for all but the wealthy, and is not necessary when you’re wearing a corset. The full skirt was held out from the hips and feet by multiple underskirts, or a hoop.

When you put together a Victorian costume, avoid just wearing your regular bra instead of a support garment like a corset, as this smooth-torso look is essential to the 19th century female appearance. Corset patterns and ready-made corsets are available, but a Merry Widow undergarment will give the modern woman a similar smooth effect. If you can't find a Merry Widow or bustier undergarment, then a bra with firm support, paired with a torso minimizer garment (one with flexible stays) can provide some of the same smoothness. As for the petticoats, you can sometimes find old wedding dresses in thrift stores, and these gowns often have an attached underskirt of tulle or netting, which can be cut from the wedding dress and worn under your costume skirt to give it some fullness. Sometimes bridal hoop skirts can be found at thrift stores, and these can be worn under your dress and underskirt; try to adjust the hoop size so that your dress skirt lies loosely over it, and avoid the “tightly-stretched” look as much as you can!

"Nineteenth-Century Fashions: a Compendium"
Cathy's Wee Victorian Fashion Page
The Costumer's Manifesto: Corsets (General Information)
The Costumer's Manifesto: Victorian Fashion Links
Elizabeth Stewart Clark's Sewing Academy

Thursday, November 12, 2009

San Francisco's Great Dickens Christmas Fair is getting ready to open!

Cathy Decker. From Englishwomen's Domestic Magazine, ca. 1865.
Despite rumors of the Cow Palace being sold to a developer, and the Dickens Fair having to move, it appears that Dickens will come back to the Cow Palace this year, the same as ever! Traditionally opening the weekend after Thanksgiving, the Dickens Fair runs 6 weekends, to the weekend before Christmas. My friends in the GBACG and I are getting our costumes in gear to attend the Dickens Fair appropriately dressed! What about you? It's not too hard to pull together a reasonably historically accurate mid-Victorian costume, although you do have to do some research so you know what to look for. Too many women just choose a long skirt and white blouse, cover it with bows and lace, and think that they have the right look!

Clothing worn during Dickens’ career openly displayed the wearer’s wealth and social standing, and often their occupation, in a way that is unfamiliar to us today. Because of the difficulty and expense of creating such high-fashion clothing today, it is recommended that women and girls assembling a mid-Victorian costume dress in a manner more appropriate to the middle and lower classes of the day. It is possible to rent suitable costumes, and also to buy complete costumes from specialty dressmakers through mail order or the Internet. The least expensive option is to put together a costume from thrift store finds, if you know what to look for, but be prepared to look through the offerings of more than one store and, especially, you should be willing to make a few alterations with needle and thread, fabric glue, hot glue, or iron-on fabric tape.

General tips: Middle and lower class women and girls imitated elements of upper class fashions, as much as their budget, occupation, and leisure time would allow. Their dresses were made of simpler fabrics like wool and cotton, in solid colors, stripes, checks, or plaids. The colors they wore were mainly muted, rather than bright or true colors, as the brighter tones were created with expensive chemical dyes. Dark colors were stylish and practical, and women coordinated, rather than perfectly matched, their accessories to their dresses. Look for neutral or muted colors in natural fabrics.

The Great Dickens Christmas Fair
The Greater Bay Area Costumer's Guild (GBACG)

Sunday, December 7, 2008

The Great Dickens Christmas Fair in California

Queen Victoria with Mr. Fezziwig at at Fezziwig's Warehouse.
After spending a few weeks doing research and a couple of days frantically sewing, trying to "update"/improve my costume, I attended the Greater Bay Area Costumer's Guild meeting at the Dickens Fair yesterday. There were a lot of people in costume, which is always fun to see; I saw a few shows including some Middle Eastern dancing, Morris dancing, traditional Celtic dancing, and Victorian ballroom dancing, and had tea at Cuthbert's Tea Shoppe with several other ladies from the Guild. Queen Victoria, Prince Albert, and some of their court also appeared at Fezziwig's Warehouse and led the ballroom through several dances, which was fun. I also caught the very beginning of the costume contest (then had to hurry off to keep my appointment with the ladies for tea) and there were some really neat costumes, including some really sweet little tiny girls. Unfortunately, I wasn't able to get very many clear pictures from the day, so you'll only see a few posted here.

They say that the venue, The Cow Palace in Daly City, CA, is going to be sold and the land developed for housing or something soon. The Dickens Fair would have to find another venue in order to continue to open each year, which is a difficult thing to do for such a large event. I was glad to be there this year since it might be the last year of the Dickens Fair! The website is www.dickensfair.com for more information. The Fair will run two more weekends in 2008, if anyone can visit. It is a really fun experience!
Now stir the fire, and close the shutters fast,
Let fall the curtains, wheel the sofa round,
And, while the bubbling and loud-hissing urn
Throws up a steamy column, and the cups
That cheer but not inebriate, wait on each,
So let us welcome peaceful evening in.
-- William Cowper (1731-1800)
"The Winter Evening" (Book Four), _The Task_ (1784)